Table of Contents
- Overview
- System Requirements
- Generating Coupon Codes
- Extending Magento's REST API to Include Coupon Auto-Generation
- Securing the Coupon AutoGen API
- Testing the Coupon AutoGen API
- Troubleshooting Suggestions
- Next Steps
Overview
Customers of traditional stores and online web stores love coupons. Typically, a merchant sends coupons to customers who input them when checking out. The coupon saves the customer money and hopefully entices the customer to visit the store more frequently. In addition, the merchant can track coupon codes to individual customers to target market those customers.
Coupon Auto Generation and the Magento REST API
Magento CE 1.7 introduced a new method of creating coupon codes—auto generation. Auto generating coupons means Magento programmatically creates several coupon codes at one time quickly and easily. However, if Magento generates the coupon codes, you'd have to manually distribute them to customers.
Magento's REST API is extensible and can easily be called by an outside program to auto generate coupon codes. You can use this feature, for example, to e-mail coupon codes to your top 100 customers.
No programming is necessary to implement the extension module discussed in this guide; however, basic familiarity with Magento modules and PHP programming is desirable.
The Coupon AutoGen API enables any authorized external program to instruct Magento to:
- Auto-generate the specified number of coupon codes
- Return these codes to the calling program—simulated in this guide using a simple
.phpfile
Implementation Details
This guide discusses how to use coupon auto generation and a web service to dynamically call the Magento REST API to generate a series of codes. The web service instantiates the underlying Magento sales rule (salesrule/rule) coupon code generator and creates a pool of new codes. These codes returned to the caller as a JSON string.
For more information about the Magento REST API, see Introduction to REST API. To extend the REST API to add a web service for generating and retrieving coupon codes, this guide discusses the following:
- Setting up an auto generated coupon rule
- Creating a module to use a REST based API extension
This guide gives you all the files to create the module; no programming is necessary. There are four module configuration.xmlfiles and one.phpfile to create the web service. - Creating a user for the OAuth access to the new service
- Testing the web service from a separate page
System Requirements
To implement and test the Coupon AutoGen API, you must have all of the following:
- Magento Community Edition (CE) 1.7 or later on Ubuntu.
- Magento Enterprise Edition (EE) 1.12 or later on Ubuntu.
- pecl OAuth 1.0a extension which you install as discussed in Installing OAuth.
Magento CE 1.7 and later support the OAuth 1.0a specification. - Optional.
phpmyadmin, which makes it easier to view and manipulate the Magento database. You can usephpmyadminfor convenience to get the OAuth key and shared secret later in this guide.
Installing OAuth
This section discusses how to install the pecl OAuth extension on Ubuntu. Consult the pecl.php.net documentation for installation instructions on other operating systems.
The pecl OAuth extension requires the PEAR installer. The following sections discuss the installation in detail:
root privileges.Creating a phpinfo File
Before you begin, create a phpinfo.php file, if you have not already done so, to determine if you already have OAuth running.
To create phpinfo.php:
- Open a command prompt window and connect to your Magento server.
- Create a file named
phpinfo.phpanywhere on the web server's docroot:<?php // Show all information, defaults to INFO_ALL phpinfo();
- Start a web browser and enter the following URL in its address or location field:
http://host-or-ip[:port]/path-to-phpinfo/phpinfo.php
For example, if your Magento instance hostname iswww.example.comand you putphpinfo.phpin the web server's docroot, enter:http://www.example.com/phpinfo.php
- Search the resulting output for
OAuth.
The following figure shows an example of OAuth being properly set up.
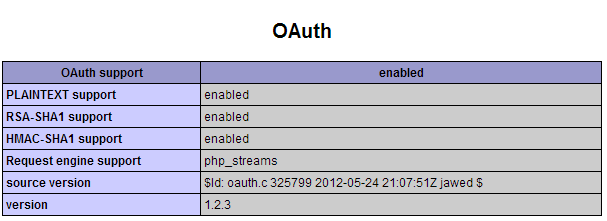
If the preceding does not display, OAuth is not set up so continue with the next section.
If OAuth is already installed, continue with Defining a Magento Coupon Code Generation Rule.
Installing the OAuth Packages
The pecl OAuth extension requires both PEAR (which enables you to install the package) and libpcre3-dev, which enables the OAuth package to be compiled.
To install the packages and confirm that OAuth is enabled:
- Enter the following commands in the order shown:
apt-get install php-pear
apt-get install libpcre3-dev
pecl install oauth
 Note: Remember that you must perform the tasks discussed in this section as a user with
 rootprivileges.Wait while each package is installed. The message
Build process completed successfullydisplays to indicate OAuth installed successfully.
If the following displays, you must edit yourNote: If Error: `make' faileddisplays after you enterpecl install oauth, see OAuth Package Installation Error: `make' failed.php.inifile to find the OAuth library:configuration option "php_ini" is not set to php.ini location You should add "extension=oauth.so" to php.ini
- Open
php.iniin a text editor.
If you're not sure where it's located look in thephpinfo.phppage output. Add the following anywhere inphp.ini:[OAuth] extension=oauth.so
- Save your changes to
php.iniand exit the text editor. - Enter the following command to restart the Apache web server.
service apache2 restart
- Continue with the next section.
Confirming that OAuth Installed Successfully
If your phpinfo.php page is still open in a web browser, press Control+R to force a refresh; otherwise, enter the URL shown in Creating a phpinfo File to view it.
The following figure shows an example of a properly set up OAuth extension.
Defining a Magento Coupon Code Generation Rule
To define a Magento coupon code generation rule:
- Log in to the Magento Admin Panel as an administrator.
- Click Promotions > Shopping Cart Price Rules.
- On the Shopping Cart Price Rules page, click Add New Rule (in the upper-right corner of the page).
The General Information page displays as follows.
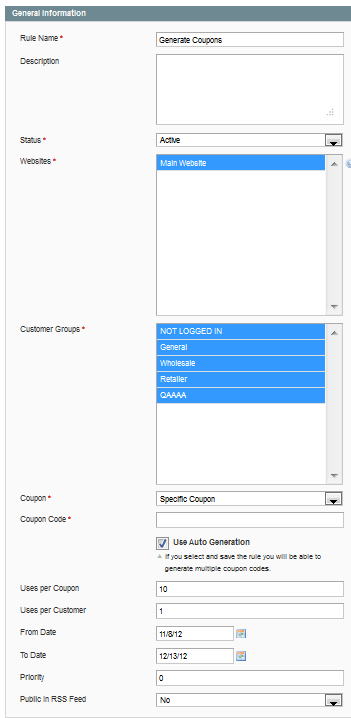
- Enter the following information.
Item Description Rule Name Enter Generate Coupons.Description Enter an optional description of the rule, such as Rule that generates a sequence of coupon codes.Status From the list, click Active. Websites Click the websites on which you want the coupons to display. Hold down the Shift key and click the names of all items to select them. Customer Groups Hold down the Shift key and click the names of all items to select them. Coupon Click Specific Coupon Coupon Code Leave the field blank. CE only. Auto Generation Select the Use Auto Generation checkbox. CE only. Uses per Coupon Enter 10.Uses per Customer Enter 1.From Date Select today's date. To Date Select any date in the future. Priority Enter 0.Public In RSS Feed Click No. - In the upper-right corner of the page, click Save and Continue Edit.
The messageThe rule has been saveddisplays at the top of the page to indicate that Magento successfully saved the rule you just created. - In the left navigation bar, click Actions.
The Actions page displays as follows.
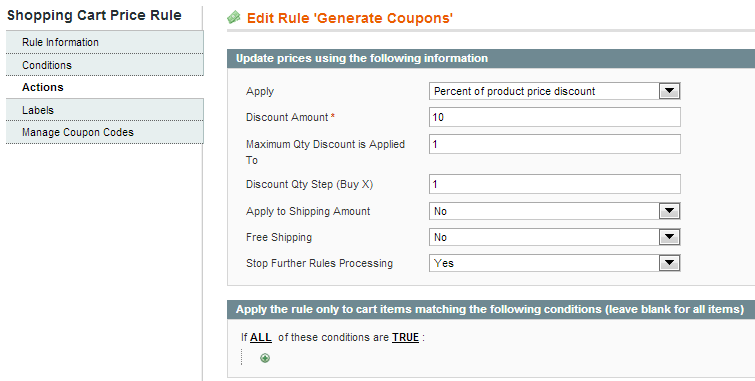
- Enter the following information.
Item Description Apply From the list, click Percent of product price discount. Discount Amount Enter 10.Maximum Qty Discount is Applied To Enter 1.Discount Qty Step (Buy X) Enter 1.Apply to Shipping Amount From the list, click No. Free Shipping From the list, click No. Stop Further Rules Processing From the list, click Yes. EE only Add Reward Points Enter 0. - Click Save (in the upper-right corner of the page).
The messageThe rule has been saveddisplays to indicate that Magento saved the rule action options you just entered. Notice that this page now has a row for the Generate Coupons rule you just defined.
A sample follows.

- Write down the rule ID (circled in red in the preceding figure). You will use this value later in this guide.
Generating Coupon Codes
Now that you've created a rule, this section discusses how to use the rule to manually generate a sequence of coupon codes.
- In the Shopping Cart Price Rules page, click the name of the rule you just created (Generate Coupons).
- In the left navigation bar, click Manage Coupon Codes.
- On the Coupons Information page, enter the following information:
Item Description Coupon Qty Enter 3.Code Length Enter 12.Code Format Click Alphanumeric. Coupon Prefix Enter TEST-.Coupon Suffix Enter -TEST.Dash Every X Characters Enter 0. - Click Generate.
Magento displays the three coupon codes you created in the Coupon Code section as the following figure shows.

- Click Save.
Extending Magento's REST API to Include Coupon Auto-Generation
In the preceding section, you created a Shopping Cart Price Rule named Generate Coupons that manually generates a set of coupon codes. To use those codes, you could export them to a file, and then import them into any external program you want; however, this is a time-consuming procedure!
Fortunately, you can automate this process by adding a coupon code auto-generate API to Magento's existing REST API. Using this API, an external program can automatically get the coupon codes it needs.
The following sections discuss how to extend Magento's REST API to include the Coupon AutoGen API:
- Disabling the Magento Cache
- Creating Configuration Files
- Setting Permissions on the Configuration Files
Disabling the Magento Cache
While you're implementing the Coupon AutoGen API, you must disable Magento's caching so Magento will find and use your new code immediately.
To disable the cache:
- In the Magento Admin Panel, click System > Cache Management.
The Cache Storage Management page displays as follows.
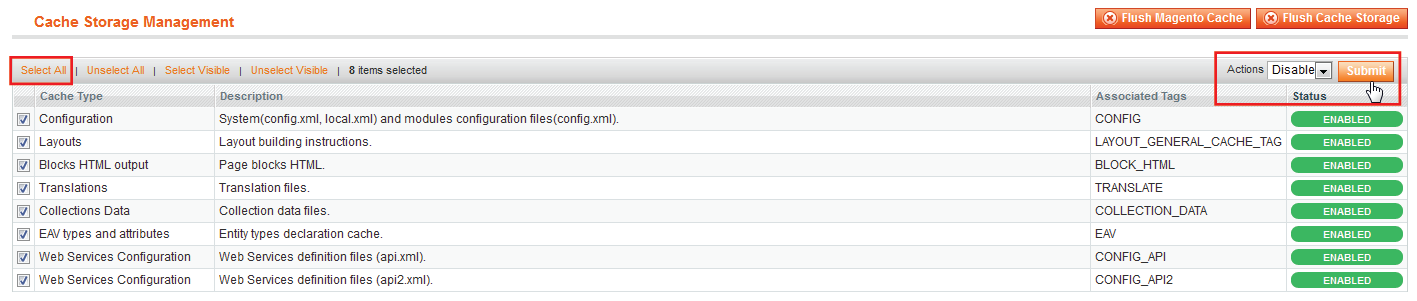
- Click Select All (on the upper-left of the page).
A check mark displays next to each Magento cache in the list. - From the Actions list, click Disable.
- Click Submit.
Magento disables the selected caches, replacing the green ENABLED status indicators with red DISABLED indicators. - Click Flush Magento Cache and wait for the cache to be flushed.
- Log out of the Magento Admin Panel.
Creating Configuration Files
This section discusses how to create a module (also referred to as an extension). The module consists of configuration files that create a web service that extends the Magento REST API to take input from an external program. This program uses HTTP POST and OAuth calls to auto-generate coupon codes.
In this guide, the external program is a PHP script; however, it could be any application that uses OAuth and REST calls.
For more information about Magento module development, see developer documentation on Magento Connect.
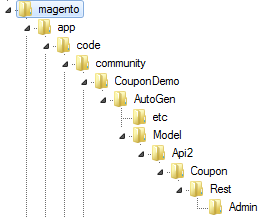
root and change the permissions appropriately later. Consult an IT administrator if you're not sure how to proceed.- Log in to your Magento server and create the following directories:
magento-install-dir/app/code/community/CouponDemo
magento-install-dir/app/code/community/CouponDemo/AutoGen
magento-install-dir/app/code/community/CouponDemo/AutoGen/etc
magento-install-dir/app/code/community/CouponDemo/AutoGen/Model
magento-install-dir/app/code/community/CouponDemo/AutoGen/Model/Api2
magento-install-dir/app/code/community/CouponDemo/AutoGen/Model/Api2/Coupon
magento-install-dir/app/code/community/CouponDemo/AutoGen/Model/Api2/Coupon/Rest
magento-install-dir/app/code/community/CouponDemo/AutoGen/Model/Api2/Coupon/Rest/Admin
For example, if Magento is installed in/var/www/magento, create the following directories:/var/www/magento/app/code/community/CouponDemo /var/www/magento/app/code/community/CouponDemo/AutoGen/etc /var/www/magento/app/code/community/CouponDemo/AutoGen/Model/Api2/Coupon/Rest/Admin
The following figure shows an example.
 Important:
 - You must create the files and directories exactly as shown; directory names are case-sensitive.
- Do not change any values in the configuration files discussed in this section.
- When you create your configuration files, leave no white space at the beginning of the files. Leading white space might cause errors when Magento reads the files and might prevent the coupon demonstration module from working.
- Change to the
magento-install-dir/app/etc/modulesdirectory. - In that directory, use a text editor to create your module declaration file. This file must be named
CouponDemo_AutoGen.xmland have the following contents.
<?xml version="1.0"?> <config> <modules> <CouponDemo_AutoGen> <active>true</active> <codePool>community</codePool> </CouponDemo_AutoGen> </modules> </config> - Save your changes to
CouponDemo_AutoGen.xmland exit the text editor. - Change to the
magento-install-dir/app/code/community/CouponDemo/AutoGen/etcdirectory. - Create a file named
config.xmlwith the following contents.
<?xml version="1.0"?> <config> <modules> <CouponDemo_AutoGen> <version>0.1.0</version> </CouponDemo_AutoGen> </modules> <global> <models> <autogen> <class>CouponDemo_AutoGen_Model</class> </autogen> </models> </global> </config> - Create a file named
api2.xmlwith the following contents.
<config> <api2> <resource_groups> <autogen translate="title" module="CouponDemo_AutoGen"> <title>CouponDemo API</title> <sort_order>10</sort_order> </autogen> </resource_groups> <resources> <autogen translate="title" module="CouponDemo_AutoGen"> <group>autogen</group> <model>autogen/api2_coupon</model> <title>Coupon Code Auto Generation</title> <sort_order>10</sort_order> <privileges> <admin> <create>1</create> <retrieve>1</retrieve> </admin> </privileges> <attributes> <coupon_id>Coupon ID</coupon_id> <code>Code</code> <qty>Quantity</qty> <length>Length</length> <format>Format</format> </attributes> <routes> <route> <route>/coupondemo/rules/:rule_id/codes</route> <action_type>collection</action_type> </route> </routes> <versions>1</versions> </autogen> </resources> </api2> </config> - Save your changes to
api2.xmland exit the text editor. - Change to the
magento-install-dir/app/code/community/CouponDemo/AutoGen/Model/Api2directory. - Create a file named
Coupon.phpwith the following contents.
<?php class CouponDemo_AutoGen_Model_Api2_Coupon extends Mage_Api2_Model_Resource { } - Save your changes to
Coupon.phpand exit the text editor. - Change to the
magento-install-dir/app/code/community/CouponDemo/AutoGen/Model/Api2/Coupon/Rest/Admindirectory. - Create a file named
V1.phpwith the following contents.
<?php /* Coupon AutoGen REST API * * @category CouponDemo * @package CouponDemo_AutoGen * @author Chuck Hudson (used with permission). For more recipes, see Chuck's book http://shop.oreilly.com/product/0636920023968.do */ class CouponDemo_AutoGen_Model_Api2_Coupon_Rest_Admin_V1 extends CouponDemo_AutoGen_Model_Api2_Coupon { /** * Generate one or more coupon codes using the Generate Coupons rule defined in Magento. * Expected parameters are: * { * 'qty': int, - number of coupon codes to instruct Magento to generate * 'length': int, - length of each generated coupon code * 'format': string, - alphanum (for alphanumeric codes), alpha (for alphabetical codes), and num (for numeric codes) * } * * @param array $couponData * @return string|void */ protected function _create($couponData) { $ruleId = $this->getRequest()->getParam('rule_id'); $couponData['rule_id'] = $ruleId; $rule = $this->_loadSalesRule($ruleId); // Reference the MassGenerator on this rule. /** @var Mage_SalesRule_Model_Coupon_Massgenerator $generator */ $generator = $rule->getCouponMassGenerator(); // Validate the generator if (!$generator->validateData($couponData)) { $this->_critical(Mage::helper('salesrule')->__('Coupon AutoGen API: Invalid parameters passed in.'), Mage_Api2_Model_Server::HTTP_BAD_REQUEST); } else { // Set the data for the generator $generator->setData($couponData); // Generate a pool of coupon codes for the Generate Coupons rule $generator->generatePool(); } } /** * Retrieve list of coupon codes. * * @return array */ protected function _retrieveCollection() { $ruleId = $this->getRequest()->getParam('rule_id'); $rule = $this->_loadSalesRule($ruleId); /** @var Mage_SalesRule_Model_Resource_Coupon_Collection $collection */ $collection = Mage::getResourceModel('salesrule/coupon_collection'); $collection->addRuleToFilter($rule); $this->_applyCollectionModifiers($collection); $data = $collection->load()->toArray(); return $data['items']; } /** * Load sales rule by ID. * * @param int $ruleId * @return Mage_SalesRule_Model_Rule */ protected function _loadSalesRule($ruleId) { if (!$ruleId) { $this->_critical(Mage::helper('salesrule') ->__('Rule ID not specified.'), Mage_Api2_Model_Server::HTTP_BAD_REQUEST); } $rule = Mage::getModel('salesrule/rule')->load($ruleId); if (!$rule->getId()) { $this->_critical(Mage::helper('salesrule') ->__('Rule was not found.'), Mage_Api2_Model_Server::HTTP_NOT_FOUND); } return $rule; } } - Save your changes to
V1.phpand exit the text editor.
Setting Permissions on the Configuration Files
File permissions and ownership are important for any Linux application. Magento provides general guidelines for permission and ownership although following them are not a requirement for this guide. The configuration files and directories can be owned by root or other users and it won't prevent the procedures discussed in this guide from completing successfully.
Consult your network administrator if you are not sure how to set file permissions and ownership. The procedure that follows is a suggestion only.
The Magento guidelines discussed in the following procedure are taken from this Magento Wiki article and set the following:
- File and directory ownership set to
your-login-name:apache-user-group.
If you're not sure which group owns Apache processes, enter the commandps -ef | grep apache2. The following procedure assumes it iswww-data. - File permissions set to 644.
- Directory permissions set to 755.
To optionally set permissions and ownership according to Magento guidelines:
- As a user with
rootprivileges, enter the following commands in the order shown to change ownership of the files and directories you created as discussed in this guide:
cd magento-install-dir/app/code/community chown -R your-login-name:www-data CouponDemo find . -type f -exec chmod 644 {} + find . -type d -exec chmod 755 {} + - As a user with
rootprivileges, enter the following commands in the order shown to change the permissions and ownership ofCouponDemo_AutoGen.xml
.cd magento-install-dir/app/etc/modules chown your-login-name:www-data CouponDemo_AutoGen.xml chmod 644 CouponDemo_AutoGen.xml
Securing the Coupon AutoGen API
For security reasons, Magento allows only authorized external programs to call the Magento REST API.
The following sections discuss how to enable the test script (discussed in the next section) to call the Coupon AutoGen API:
- Creating a REST role for the Coupon AutoGen API
- Adding Users to the Coupon Auto Generate Demo Role
- Setting up REST Attributes for the Coupon AutoGen API
- Creating an OAuth Consumer for Your Test Script
Creating a REST role for the Coupon AutoGen API
To use the Magento Admin Panel to create a role for the Coupon AutoGen API:
- Log in to the Magento Admin Panel as an administrator.
- Click System > Web Services > REST - Roles.
- On the REST—Roles page, click Add Admin Role.
- In the Role Name field, enter
Coupon Auto Generate Demo. - Click Save Role.
- In the left navigation bar, click Role API Resources.
The Role Resources page contains a hierarchical list of resources to which you can grant or deny the Coupon Auto Generate Demo role access. - From the Resource Access list, click Custom.
Select the checkbox next to the node labeled CouponDemo API.
Magento automatically checks the child checkboxes as the following figure shows.
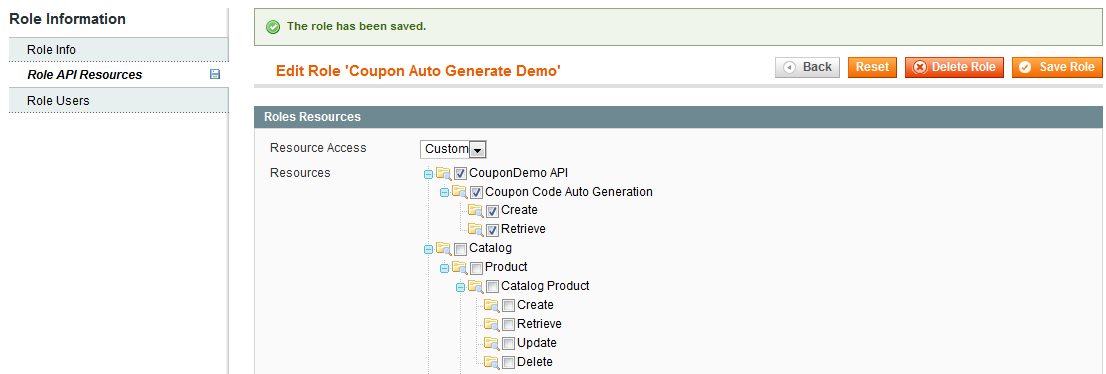
- Click Save Role.
Magento saves the resource API permissions you granted to the Coupon Auto Generate Demo REST role.
The Coupon Auto Generate Demo role now has permission to use the Coupon AutoGen API.
Adding Users to the Coupon Auto Generate Demo Role
Now that you have a role, you must add users to give them permission to call the Coupon AutoGen API as follows:
- In the left navigation bar, click Role Users.
- Click Reset Filter (in the upper-right corner of the page).
The page displays all registered users as the following figure shows.

- Select the checkbox next to each user to grant the user privileges to access the resources available to the Coupon Auto Generate Demo REST role—that is, permission to call the Coupon AutoGen API.
Note: If a warning dialog box displays, click OK to dismiss it. This warning is not relevant when adding users to REST roles. - When you're done, click Save Role.
The specified user(s) can now grant an external program the right to call the Coupon AutoGen API.
Setting up REST Attributes for the Coupon AutoGen API
This section discusses how to enable any user with a REST Admin role to use the Coupon AutoGen API.
To set REST attributes for the REST Admin role:
- Click System > Web Services > REST - Attributes.
- On the REST Attributes page, under User Type, click Admin.
- In the User Type Resources section, from the Resource Access list, click Custom.
- Select the CouponDemo API checkbox.
Doing so selects all the child checkboxes, as the following figure shows.
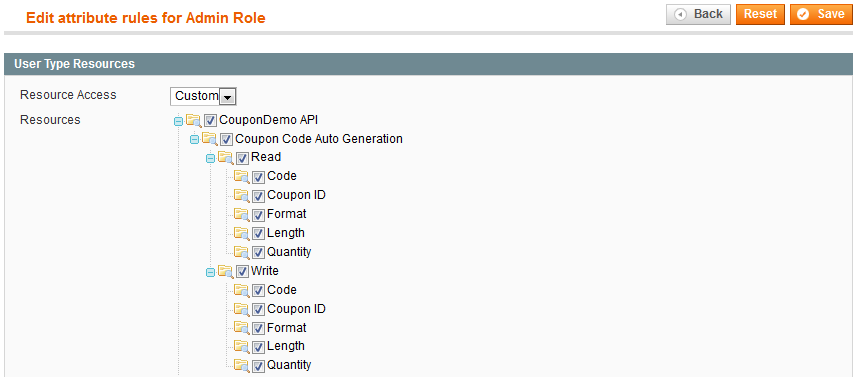
- Click Save.
Any user with the REST Admin role can now read from and write to the Coupon AutoGen API.
Creating an OAuth Consumer for Your Test Script
This section discusses how to create a consumer so you can test the Coupon AutoGen API before you deploy it in a production system. After successfully testing the API, you can remove this user.
- In the Magento Admin Panel, click System > Web Services > REST - OAuth Consumers.
- Click Add New (in the upper-right corner of the page).
The New Consumer page displays as the following figure shows.
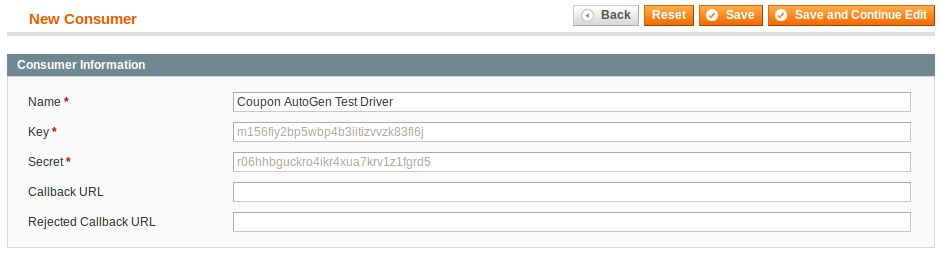
- In the Name field, enter
Coupon AutoGen Test Driver. - Leave the other fields blank.
- Write down the values displayed in the Key and Secret text boxes.
You must include these values in the test script you will write in the next section. The script uses these values to identify itself to Magento.Note: The key and secret values are stored in the Magento database in the table oauth_consumer. It might be more convenient for you to usephpmyadminor database tools to retrieve them from the database after you save the role. - Click Save (in the upper-right corner of the page).
- Log out of the Magento Admin Panel.
Testing the Coupon AutoGen API
This section discusses how to create a simple PHP file that acts as an external program and, with permissions you granted the OAuth consumer, enables the program to use the HTTP POST method to auto generate coupon codes.
You can use any type of OAuth/REST call, in fact, such as using the Firefox REST Client plug-in as discussed here.
The following sections discuss how to create and run the test script:
Creating the Test Script
The test script you create calls the Coupon AutoGen API, thereby causing Magento to generate the specified coupon codes and return them to the caller (rest_test.php) in the form of a JSON-encoded string. Finally, the server responds to the browser's request with an HTML page containing the generated coupon codes.
The PHP code that follows:
- Uses your OAuth
consumerKeyandconsumerSecretto set up the OAuth client. - Defines data to pass to the array
$couponGenerationData. The data should include the following:- The rule ID (listed next to the rule in the rule list in the Magento Admin Panel)
- The number of codes desired (in this case, two)
- The length of the codes
- The format to be used (in this case, alphanumeric)
- The array of parameters is then passed in the
fetchcommand with theresourceUrlfor the web service call.
Finally, the server responds to the browser's request with an HTML page containing the generated coupon codes.
To create the test script, named rest_test.php:
- Create the file
magento-install-dir/rest_test.phpwith the following contents.<?php /******************************************************************** File name: rest_test.php Description: A PHP test script that calls the Coupon AutoGen extension to Magento's REST API. The Coupon AutoGen API takes: -- the rule ID of the "Generate Coupons" rule to execute -- the number of coupon codes to generate -- the length of each coupon code -- the format of each coupon code The API returns the generated coupon codes, in JSON-encoded form ********************************************************************/ // Replace <<...>> below with the key and secret values generated for the Coupon AutoGen Test Driver $consumerKey = '<<YOUR CONSUMER KEY>>'; // from Admin Panel's "REST - OAuth Consumers page" $consumerSecret = '<<YOUR CONSUMER SECRET>>'; // from Admin Panel's "REST - OAuth Consumers page" // Set the OAuth callback URL to this script since it contains the logic // to execute *after* the user authorizes this script to use the Coupon AutoGen API $callbackUrl = "http://<<host-or-ip:port>>/<<path>>/rest_test.php"; // Set the URLs below to match your Magento installation $temporaryCredentialsRequestUrl = "http://<<host-or-ip:port>>/<<path>>/oauth/initiate?oauth_callback=" . urlencode($callbackUrl); $adminAuthorizationUrl = 'http://<<host-or-ip:port>>/<<path>>/admin/oauth_authorize'; $accessTokenRequestUrl = 'http://<<host-or-ip:port>>/<<path>>/oauth/token'; $apiUrl = 'http://<<host-or-ip:port>>/<<path>>/api/rest'; session_start(); if (!isset($_GET['oauth_token']) && isset($_SESSION['state']) && $_SESSION['state'] == 1) { $_SESSION['state'] = 0; } try { $authType = ($_SESSION['state'] == 2) ? OAUTH_AUTH_TYPE_AUTHORIZATION : OAUTH_AUTH_TYPE_URI; $oauthClient = new OAuth($consumerKey, $consumerSecret, OAUTH_SIG_METHOD_HMACSHA1, $authType); $oauthClient->enableDebug(); if (!isset($_GET['oauth_token']) && !$_SESSION['state']) { $requestToken = $oauthClient->getRequestToken($temporaryCredentialsRequestUrl); $_SESSION['secret'] = $requestToken['oauth_token_secret']; $_SESSION['state'] = 1; header('Location: ' . $adminAuthorizationUrl . '?oauth_token=' . $requestToken['oauth_token']); exit; } else if ($_SESSION['state'] == 1) { $oauthClient->setToken($_GET['oauth_token'], $_SESSION['secret']); $accessToken = $oauthClient->getAccessToken($accessTokenRequestUrl); $_SESSION['state'] = 2; $_SESSION['token'] = $accessToken['oauth_token']; $_SESSION['secret'] = $accessToken['oauth_token_secret']; header('Location: ' . $callbackUrl); exit; } else { // We have the OAuth client and token. Now, let's make the API call. $oauthClient->setToken($_SESSION['token'], $_SESSION['secret']); // Set the array of params to send with the request $ruleId = <<RULE_ID>>; // Set to the rule ID of the Generate Coupons rule $couponGenerationData = array(); $couponGenerationData['qty'] = 2; // Number of coupons codes to create $couponGenerationData['length'] = 7; // Length of each coupon code // Options for format include: // alphanum (for alphanumeric codes), alpha (for alphabetical codes), and num (for numeric codes) $couponGenerationData['format'] = "alphanum"; // Use alphanumeric for the coupon code format // Generate coupon codes via POST $resourceUrl = "$apiUrl/coupondemo/rules/{$ruleId}/codes"; $oauthClient->fetch($resourceUrl, json_encode($couponGenerationData), OAUTH_HTTP_METHOD_POST, array( 'Accept' => 'application/json', 'Content-Type' => 'application/json', )); // Retrieve list of created coupons via GET $collectionFilters = array('limit' => $couponGenerationData['qty'], 'order' => 'coupon_id', 'dir' => 'dsc'); $oauthClient->fetch($resourceUrl, $collectionFilters, OAUTH_HTTP_METHOD_GET, array( 'Accept' => 'application/json', 'Content-Type' => 'application/json', )); $coupons = json_decode($oauthClient->getLastResponse(), true); // Display the newly generated codes to demonstrate that the Coupon AutoGen API works // In reality, you might put these codes in emails to customers, store them in a database, etc. echo "New coupon codes:
"; foreach ($coupons as $coupon) { echo " --> " . $coupon['code'] . "
"; } } } catch (OAuthException $e) { print_r($e->getMessage()); echo "
"; print_r($e->lastResponse); } - The following table discusses the values you must change.
String to change How to change it <<YOUR CONSUMER KEY>> Coupon AutoGen Test Driver OAuth consumer's key.
You can view this in the Admin Panel: System > Web Services > REST - OAuth Consumers or you can get the value from the
oauth_consumertable in the Magento database.<<YOUR CONSUMER SECRET>> Coupon AutoGen Test Driver OAuth consumer's secret.
You can view this in the Admin Panel: System > Web Services > REST - OAuth Consumers or you can get the value from the
oauth_consumertable in the Magento database.<<host-or-ip:port>>/<<path>> Your Magento instance's fully qualified hostname or IP address and port, if you are using a port other than 80, and the path to your Magento installation. If you are running Magento on localhost, enter
127.0.0.1For example, if your Magento server's hostname is
www.example.com, running on port 80, and Magento is installed at/var/www/magento, enterhttp://www.example.com/magento<<RULE_ID>> Generate Coupons rule ID.
Get this value by clicking Promotions > Shopping Cart Price Rules
. - Save the file and close the text editor.
Running the Test Script
To run the test script:
- Start a web browser.
- In the browser's address or location field, enter:
http://magento-server-host-or-ip[:port]/rest_test.php
- When prompted, enter the login credentials of the OAuth consumer you created as discussed in Creating an OAuth Consumer for Your Test Script.
- Click Login.
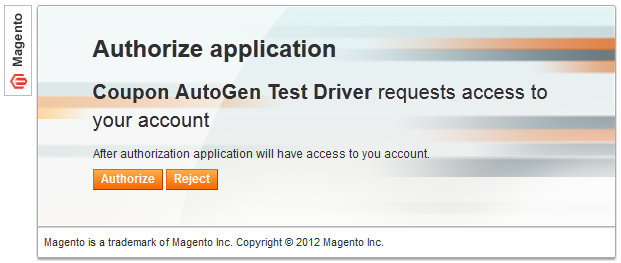
- When prompted, click Authorize to grant authorization for the script to access your OAuth consumer account, as the following figure shows.
- When prompted, log in as that user.
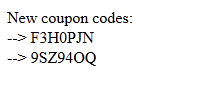
After you log in, two new coupon codes display as follows to confirm you successfully used the API. If your browser displays a page like this one, you've successfully implemented the Coupon AutoGen REST API!
To optionally see these codes in the Admin Panel:
- Log in to the Admin Panel as an administrator.
- Click Promotions > Shopping Cart Price Rules.
- Click Generate Coupons.
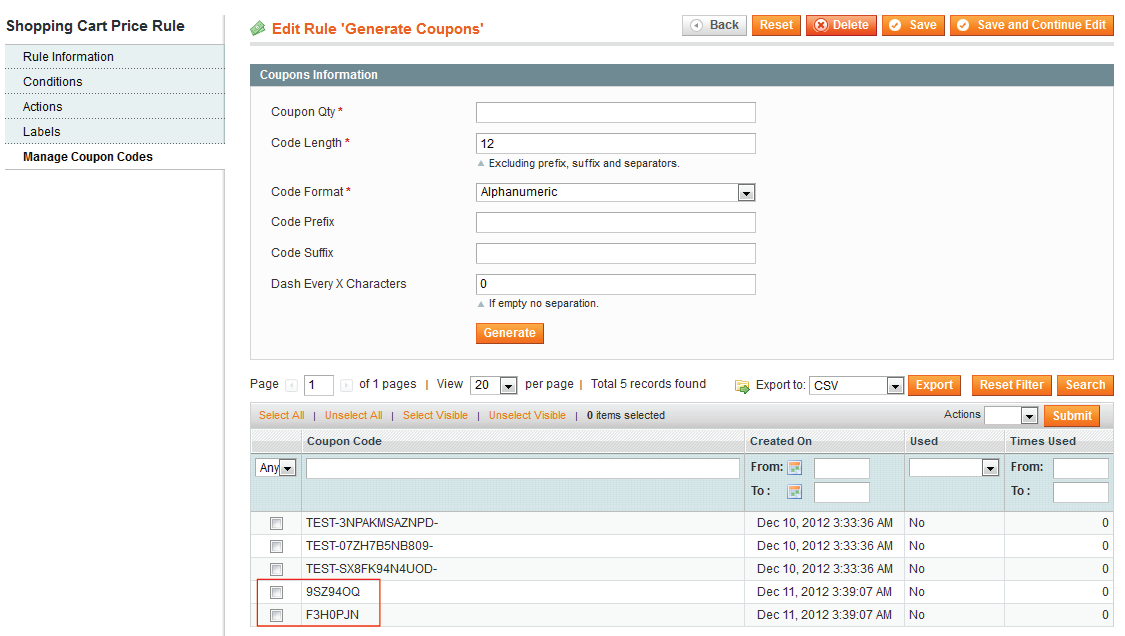
- In the left navigation bar, click Manage Coupon Codes.
The codes you generated manually earlier display with the new codes (highlighted in red) as the following figure shows.
Re-Enabling Magento's Cache
Only after successfully completing the test, you should re-enable Magento's caching system, so performance returns to normal.
To re-enable the Magento cache:
- In the Magento Admin Panel, click System > Cache Management.
- On the Cache Storage Management page, click Select All (in the upper-left of the page).
A check mark displays next to each Magento cache in the list. - Click
Enablefrom the Actions list. - Click Submit.
Magento enables the selected caches. You can tell because the red DISABLED status indicator is replaced by a green ENABLED indicator. - Click Select All again.
- Click
Refreshfrom the Actions list. - Click Submit.
Magento reloads the selected caches. Magento now performs much faster.
Congratulations! You have successfully added the Coupon AutoGen API to Magento's REST API. Following the same procedure, you can expose lots of Magento functionality to external programs.
Troubleshooting Suggestions
The following sections discuss solutions to issues you might encounter when setting up this demonstration:
- OAuth Package Installation Error: `make' failed
- CouponDemo API Calls Options Don't Display in the Admin Panel
- Errors Running rest_test.php
OAuth Package Installation Error: `make' failed
Problem: OAuth package installation fails with the error ERROR: `make' failed.
Description: In some cases, the pecl install oauth command does not install a C compiler. If you encounter the following error, you must install the make package; otherwise, OAuth won't compile:
1: make: not found
ERROR: `make' failed
Solution:
- Enter the following commands in the order shown as a user with
rootprivileges:apt-get install make pecl install oauth
- Make sure the message
Build process completed successfullydisplays to indicate OAuth compiled successfully.
If the following displays, you must edit yourphp.inifile to find the OAuth library:configuration option "php_ini" is not set to php.ini location You should add "extension=oauth.so" to php.ini
- Open
php.iniin a text editor.
If you're not sure where it's located look in thephpinfo.phppage output. Add the following anywhere inphp.ini:[OAuth] extension=oauth.so
- Save your changes to
php.iniand exit the text editor. - Enter the following command to restart the Apache web server.
service apache2 restart
- Verify the OAuth installation succeeded as discussed in Confirming that OAuth Installed Successfully.
CouponDemo API Calls Options Don't Display in the Admin Panel
Problem: After setting up the CouponDemo configuration files, the CouponDemo API Calls checkboxes do not display in the Admin Panel. A sample is shown in a figure earlier in this guide.
Description: The CouponDemo API Calls checkboxes display to indicate you set up the module correctly. If they don't display, either the Magento cache hasn't been entirely cleared or there's something wrong with the directory structure or configuration files.
Solution: Use the following steps to isolate and correct the issue:
- Make sure your directory structure is set up exactly as shown in this figure earlier in this guide.
- Make sure you copied the exact text from the sample configuration files discussed in Creating Configuration Files. Do not change anything, and remember that case is important.
- Clear the Magento cache in all of the following ways:
- As a user with sufficient privileges to delete files and directories in the Magento installation, enter the following commands:
rm -r magento-install-dir/var/cache
rm -r magento-install-dir/var/session
- Log in to the Magento Admin Panel as an administrator and click System > Cache Management.
Click Flush Magento Cache.
Click Flush Cache Storage and follow the prompts on your screen to delete the cache storage.
- As a user with sufficient privileges to delete files and directories in the Magento installation, enter the following commands:
- Log out of the Magento Admin Panel and log back in.
- Click System > REST - Roles.
- Click Coupon Auto Generate Demo.
- In the left navigation bar, click Role API Resources.
- If the CouponDemo API Calls checkboxes do not display, double-check all of the
.xmlconfiguration files to make sure there is no leading white space (that is, there are no blank lines at the beginning of the files.
Remove any blank lines and save the.xmlfiles.
Errors Running rest_test.php
The following sections discuss issues you might encounter when you run rest_test.php in a web browser:
- Problem: Invalid auth/bad request
- Invalid auth/bad request: Rule was not found
- Invalid auth/bad request: /magento/oauth/initiate was not found on this server
Invalid auth/bad request: oauth_problem=consumer_key_rejected
The following error displays in the web browser:
Invalid auth/bad request (got a 401, expected HTTP/1.1 20X or a redirect)
{"messages":{"error":[{"code":401,"message":"oauth_problem=consumer_key_rejected"}]}}
Description: Your OAuth authentication attempt failed because the credentials are incorrect.
Solution: Open rest_test.php in a text editor and verify the values of the following:
$consumerKey = 'value';
$consumerSecret = 'value';
You can find these values in the oauth_consumer database table or in the Admin Panel: System > Web Services > REST - OAuth Consumers.
After verifying the correct values, save your changes to rest_test.php and try again.
Invalid auth/bad request: Rule was not found
The following error displays in the web browser:
Invalid auth/bad request (got a 404, expected HTTP/1.1 20X or a redirect)
{"messages":{"error":[{"code":404,"message":"Rule was not found."}]}}
Description: The shopping cart promotion rule could not be found.
Solution: Open rest_test.php in a text editor and verify the value of the following:
$ruleId = value;
You can find this value in the Admin Panel: Promotions > Shopping Cart Price Rules.
Change the value in rest_test.php, save it, and try again.
Invalid auth/bad request: /magento/oauth/initiate was not found on this server
The following error displays in the web browser:
Invalid auth/bad request (got a 404, expected HTTP/1.1 20X or a redirect)
Not Found
The requested URL /magento/oauth/initiate was not found on this server.
Description: The HTTP redirect failed, most likely because web server rewrites are not properly enabled.
Solution: Make sure web server rewrites are enabled. The procedure you use depends on your web server and operating system. An example for Ubuntu can be found here.
Next Steps
Refer to Magento APIs—REST for documentation explaining how the Magento's REST API framework works.