Contents
Overview
Magento Enterprise Edition (EE) versions 1.8.0.0 and later enable you to configure either of the following as a catalog search engine:
- Full text search using the MySQL database (the default)
- The Apache Solr search engine
Solr enables you to provide your web store users with a powerful full-text search engine that includes:
- Faceted search
- Dynamic clustering using SolrCloud
- Database integration
See one of the following sections for more information:
- Intended Audience and Purpose of this Guide
- Comparing the Search Options
- Support Matrix for Solr and Magento EE
- More Information About the Solr Solution
Intended Audience and Purpose of this Guide
This guide is intended for Magento EE administrators and systems integrators who have some familiarity with search engines—ideally, who also have Solr configuration experience. No programming is required to perform the tasks discussed in this guide.
This guide discusses a simple Solr configuration that uses the example Solr configuration provided with Solr, default Solr integration options provided with Magento EE, and also explains how to configure Magento EE to use Solr. Advanced configuration tasks—such as setting up dictionaries—are beyond the scope of this guide.
Comparing the Search Options
The following table provides a quick comparison between Magento with the default MySQL full text search and Magento with Solr search.
| Feature | Magento with MySQL full-text search | Magento with Solr search |
|---|---|---|
| Full text search |
Yes and also supports two additional search modes:
| Yes† |
| Search recommendations | Yes | Yes |
| Faceted search (used in layered navigation) | Yes | Yes |
| Range (such as price range) | Yes | Yes |
| Sort-by options (for example, sort by relevance) | Yes | Yes |
| Zero results tips or results correction | No | Yes |
| Suggestions | No | Yes |
| Clustering | No | Yes |
| Attribute weight based on attribute settings | No | Yes |
| Search localized characters | No | Yes |
| Word delimiter (for example, searching for spider man or spiderman return spider-man) | No | Yes |
Support Matrix for Solr and Magento EE
The following table summarizes what versions of Magento EE work with what versions of Solr.
| Magento EE version | Compatible Solr version(s) | Comment |
|---|---|---|
| EE 1.14.x.x | Any version up to 3.6.2. | No patch is required to use EE 1.14.x.x with Solr 3.6.2. Click here to browse the list of all available Solr versions. |
| EE 1.13.x.x | Any version up to 3.6.2. | Click here to browse the list of all available Solr versions. |
| EE 1.12.0.x | Any version up to 3.5.0 |
If you use a later version, such as 3.6.x, see Information About Enterprise Edition (EE) Patches for Apache Solr to get a patch. Click here to browse the list of all available Solr versions. |
| EE 1.8.0.0 to 1.11.0.2 | Any version up to 3.4.0. |
To use a Solr version later than 1.4.x, see Information About Enterprise Edition (EE) Patches for Apache Solr to get a patch. Click here to browse the list of all available Solr versions. |
More Information About the Solr Solution
Solr runs as a standalone full-text search server in a servlet container such as Jetty (which is used by the Solr example configuration) and Tomcat.
Solr uses the Lucene Java search library for full-text indexing and search. Your applications interact with Solr using HTTP POST (in JSON, XML, CSV, or binary formats) to index documents and using HTTP GET to retrieve search results back as JSON, XML, or a variety of other formats (Python, Ruby, PHP, CSV, binary, and so on). If you're a programmer, try the Solr tutorial. Whether you're a programmer or not, read the Solr FAQ.
No programming is required to implement Solr as discussed in this guide.
Solr's powerful external configuration allows it to be tailored to almost any type of application without Java coding, and it has an extensive plug-in architecture when more advanced customization is required. Solr is highly scalable, providing distributed search and index replication.
In this guide, you'll use the example configuration provided with Solr and Magento's provided Solr configuration to implement a simple, quick integration with Solr.
Some reasons to use Solr with Magento include:
- Magento ships with a sample Solr configuration that enables you to provide users with a powerful search engine without your needing to customize any code.
- You get better performance of search, catalog views, and layered navigation.
- When the system is under load, Solr avoids frequent updates of the MySQL catalogsearch_fulltext table and alleviates issues with database table locks.
Simple Comparison of Solr and MySQL Search Engines
Following is a simple comparison of the default MySQL full-text search and Solr search using Magento EE 1.14.0.0 and Solr 3.6.2. Magento EE catalog content is provided by sample data you can download from Magento.
Among the many options Solr gives you is the option to suggest names of products in the event the user enters an incomplete or incorrect search term in your Magento store's Search field.
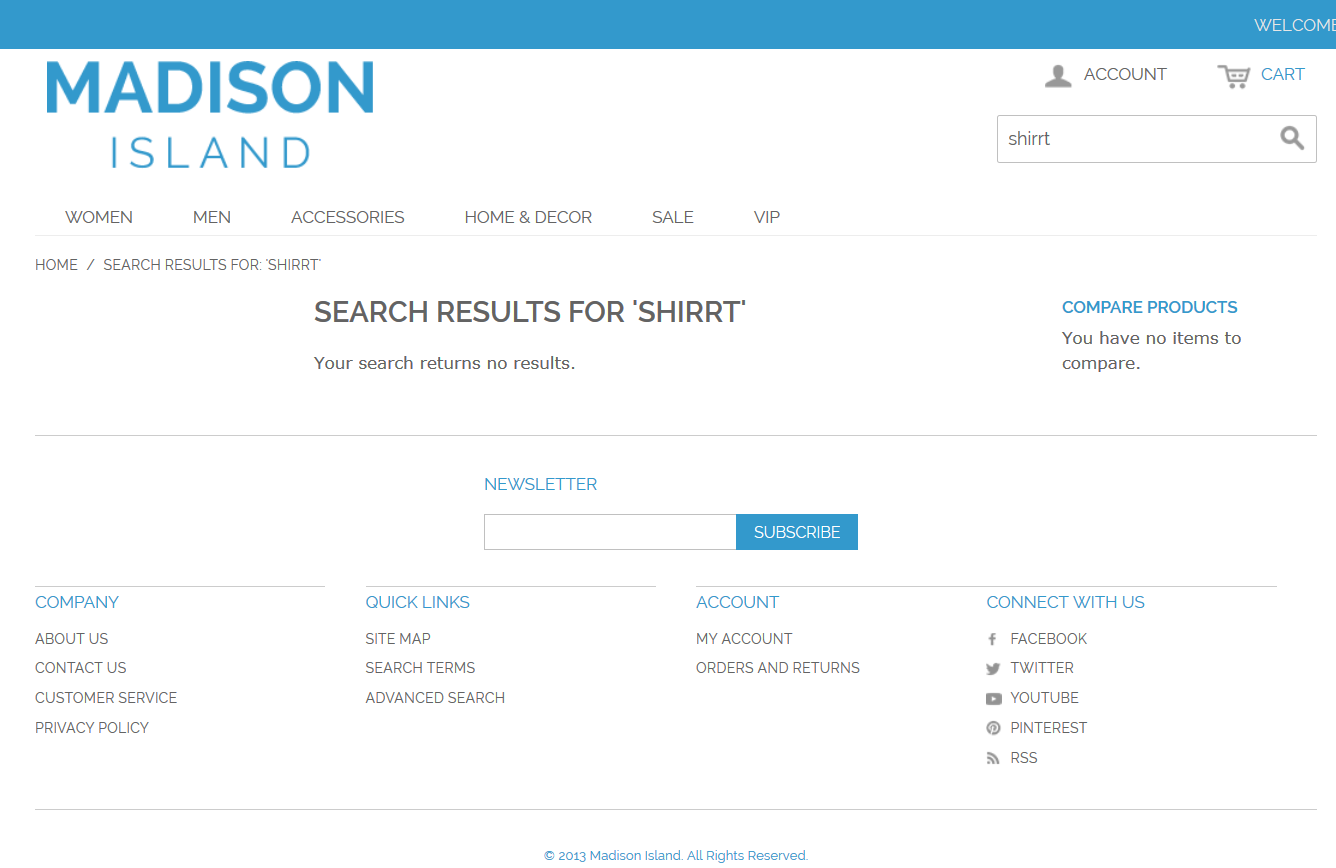
Default MySQL Full-Text Search Using an Incorrect Search Term
Using the default MySQL full-text search, if a user enters an incorrect search term (such as shirrt instead of shirt, no results display as the following figure shows.
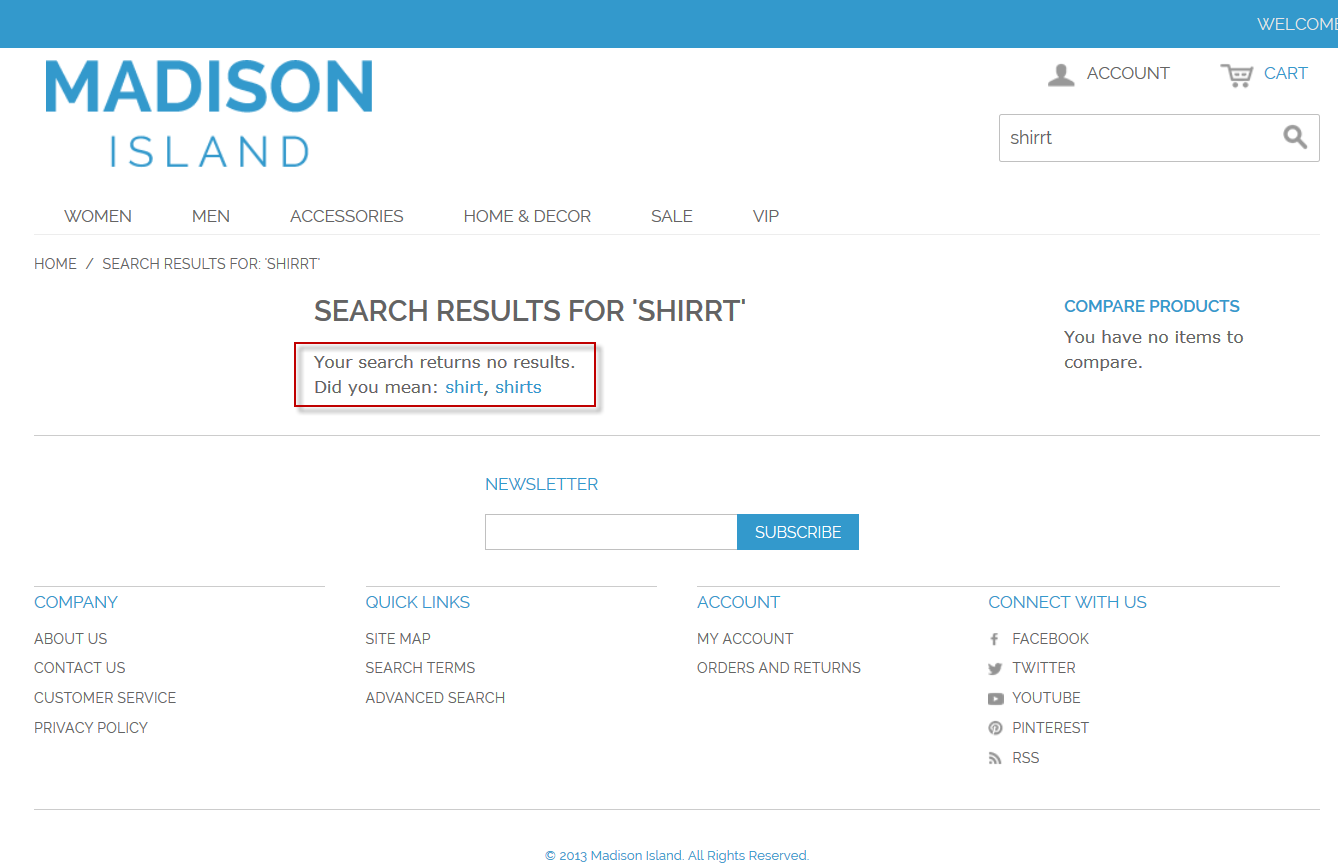
Solr Search Using an Incorrect Search Term
Using Solr, if a user enters an incorrect search term, suggestions display as the following figure shows.
In addition, if a user enters an incomplete search term, Magento provides dictionary-based suggestions as the following figure shows.

Prerequisites
The tasks discussed in this guide require the following:
- Magento EE and Solr versions discussed in Support Matrix for Solr and Magento EE.
- Java version 1.6 or later.
To determine if Java is already installed, enter the following command:
java -version
If the message java: command not found displays, you must install the Java SDK as discussed in the next section. If Java is installed, make sure it's version 1.6 or later. - Tomcat or Jetty servlet container. This guide discusses using Jetty, which comes with Solr. Consult another
resource, such as the Solr Wiki, to use Tomcat
with Solr.
To see if you're currently running Jetty and to check the version, see How to find out the version of Jetty.
Installing Prerequisite Software
The following sections discuss how to install the prerequisite software:
Installing the Java 6 SDK
To install the Java 6 SDK, enter the following command as a user with root privileges:
apt-get install openjdk-6-jdk
To install Java 7, enter the following command as a user with root privileges:
apt-get install openjdk-7-jdk
Installing Solr 3.6.2 and Jetty
The Apache Solr package installs both Solr and Jetty. If Jetty is already installed, see the Solr with Jetty Wiki for more information.
To install Solr and Jetty:
- Find a suitable Solr distribution.
If you're not sure what version of Solr to use, see Support Matrix for Solr and Magento EE.
- As a user with root privileges, use wget or a similar command to download the file to an empty
directory such as /etc/solr. An example follows.
cd empty-directory
wget http://archive.apache.org/dist/lucene/solr/3.6.2/apache-solr-3.6.2.tgz
Messages similar to the following display to confirm a successful download.
wget http://archive.apache.org/dist/lucene/solr/3.6.2/apache-solr-3.6.2.tgz
--2012-11-01 16:20:16--  http://archive.apache.org/dist/lucene/solr/3.6.2/apache-solr-3.6.2.tgz
Resolving archive.apache.org... 140.211.11.131
Connecting to archive.apache.org|140.211.11.131|:80... connected.
HTTP request sent, awaiting response... 200 OK
Length: 78673382 (75M) [application/x-tar]
Saving to: `apache-solr-3.6.2.tgz'

100%[======================================>] 78,673,382  1.41M/s   in 36s

2012-11-01 16:20:52 (2.08 MB/s) - `apache-solr-3.6.2.tgz' saved [78673382/78673382]
- Unpack the Solr installation; an example follows.
tar -xvf apache-solr-3.6.2.tgz
- Continue with the next section.
Configuring Solr to Work With Magento
The following topics discuss how to configure Solr to work with Magento EE:
Copying the Magento Solr Configuration and Starting Solr
Magento comes packaged with a sample Solr configuration you can use and customize. To get started, you'll copy the Magento configuration to Solr, replacing any existing files. After that you can start Solr and begin configuring Magento to work with it.
To copy the Magento Solr configuration:
- As a user with root privileges, enter the following commands in the order shown to copy over the Solr
configuration with the one packaged with Magento EE:
cd [your Solr install dir]/example/solr/conf
cp -R [your Magento install dir]/lib/Apache/Solr/conf/* .
For example, if Solr is installed in /etc/solr/apache-solr-3.6.2 and Magento is installed in /var/www/magento, enter:
cd /etc/solr/apache-solr-3.6.2/example/solr/conf
cp -R /var/www/magento/lib/Apache/Solr/conf/* .
 Note: If you're prompted to overwrite files, try the command \cp -R [your
Magento install dir]/lib/Apache/Solr/conf/* .
Note: If you're prompted to overwrite files, try the command \cp -R [your
Magento install dir]/lib/Apache/Solr/conf/* . - CentOS with Tomcat 6 only. If you're using Tomcat 6 on CentOS, you must modify [your Solr install
dir]/example/solr/conf/solrconfig.xml
Locate the following line:
<dataDir>${solr.data.dir:./solr/data}</dataDir>Change it to:
<dataDir>${solr.data.dir:}</dataDir> - As a user with root privileges, enter the following command to start Solr:
java -jar [your Solr install dir]/example/start.jar
Note: This method for starting Solr is for convenience and testing purposes
only. In a production environment, you should start and stop Solr using a script as discussed in Scripting Solr Startup and Shutdown.Configuring Magento to Work With Solr
This section discusses how to configure Magento EE to use the Solr search engine.
To configure Magento to work with Solr:
- Log in to the Magento Admin Panel as an administrator.
- Click System > Configuration > CATALOG > Catalog.
- In the right pane, expand Catalog Search.
- The following table shows the minimum amount of information to enter to test the connection to your Solr
search engine. Leave all other values at their defaults.
Option Description Search Engine Click Solr Solr Server Hostname Enter the fully qualified hostname or IP address of the machine running Solr. (If Solr is running on the same host as Magento, you can optionally use 127.0.0.1.) Solr Server Port Enter Solr's listen port. (The example Jetty servlet container uses 8983. The default for Tomcat is usually 8080.) Solr Server Username Optional. Enter a username for Solr authentication, if desired. Solr Server Password Optional. Enter the user's password, if desired. Solr Server Timeout Enter a connection timeout value, in seconds. Solr Server Path Specifies the path and name of the Solr web application. The path used by the example Solr configuration is solr.
If you customized Solr, the value you enter in this field must exactly match the value of webapp_name=value in [your Solr install dir]/example/solr/conf/scripts.conf.
Indexation Mode Specifies how Solr processes indexed content.
From the Indexation Mode list, click one of the following:
-
Final commit (Default, recommended): After you reindex the content search index, Solr starts processing content. Users see results from content that was searchable before indexing started and the Magento store remains available for other requests.
Final commit has much better performance then partial commit, and does not require any additional Solr configuration as does engine autocommit.
Indexing begins after all unneeded data is removed and new data is added. At that point, users see results from newly indexed data immediately.
- Partial commit: All content is removed from Solr after you reindex the content search index and users at that time see no search results. As content is gradually reindexed, users see only the results of content that has been indexed.
-
Engine autocommit: Content is put in the index queue but is not committed. You must configure Solr to commit at regular intervals (for example, every 5 minutes) or when a certain number of uncommitted items is reached.
For more information, see the discussion of the <autoCommit> XML element in the solrconfig.xml section of the Solr Wiki.
The following figure shows an example.

-
- Click Test Connection.
The button changes as follows.
Button state Meaning 
The test connection succeeded. Click Save Config and continue with the next section. 
The test connection failed. Try the following: - Examine the command window in which you started Solr for stack traces and exceptions. You must
resolve those before you continue.
In particular, make sure you started Solr as a user with root privileges. - Verify that allow_url_fopen = On is present in your server's
php.ini.
If you are not sure where php.ini is located, you can create a phpinfo.php page to locate it. - Verify the value of the Solr Server Hostname field. Make sure the server is available. You can try the server's IP address instead.
- Use the command netstat -an | grep listen-port command to verify that the port
specified in the Solr Server Port field is not being used by another process.
For example, to see if Solr is running on its default port, use the following command:netstat -an | grep 8983
If Solr is running on port 8983, it displays similar to the following:
tcp 0 0 :::8983 :::* LISTEN - If Solr is installed on a remote machine, use the ping command to verify that machine is reachable from your Magento instance.
- If SELinux is enabled, make sure the Solr servlet container's listen port is available; otherwise, Magento cannot communicate with the servlet container. For example, you can consult the SELinux Centos wiki.
- Examine the command window in which you started Solr for stack traces and exceptions. You must
resolve those before you continue.
- Only after the test connection succeeds, click Save Config and continue with the next section.
Basic Solr Configuration
This section discusses how to configure Magento to work with Solr using options in the Admin Panel. Although additional Solr customization is possible, it is beyond the scope of this guide.
 Important: Customize the Solr search engine at your own risk.
Magento supports only the options displayed in the Admin Panel. Customizing the Solr engine itself, while
potentially useful, can cause issues with Magento. If you encounter problems with your customizations, do not
contact Magento Support; instead, consult the resources available from the Apache Solr Wiki.
Important: Customize the Solr search engine at your own risk.
Magento supports only the options displayed in the Admin Panel. Customizing the Solr engine itself, while
potentially useful, can cause issues with Magento. If you encounter problems with your customizations, do not
contact Magento Support; instead, consult the resources available from the Apache Solr Wiki.To configure Magento to work with Solr:
- Start the Magento Admin Panel and log in as an administrator.
- Click System > Configuration.
- In the left navigation bar, under the CATALOG group, click Catalog > Catalog Search.
- The following table shows the minimum amount of information to enter to test the connection to your Solr
search engine. Leave all other values at their defaults.
Option Description Minimal Query Length Enter the minimum number of characters permitted for a catalog search. Maximum Query Length Enter the maximum number of characters permitted for a catalog search. Search Engine
Solr Server Hostname
Solr Server Port
Solr Server Username
Solr Server Password
Solr Server Timeout
Solr Server Path
Indexation ModeDiscussed in Configuring Solr to Work With Magento. Enable Search Suggestions Suggestions are the native Solr mechanism of advising users in the event they enter incomplete or incorrect user input. Suggestions, when enabled, are automatically provided as part of any search request.
Solr completes incomplete or incorrect input using a dictionary that is based on the main index (and can be customized using configuration files to use any other arbitrary dictionary). Suggestions display with default text "Did you mean:" in the search results page if needed.
Notes:
- Search suggestions are not the same as AJAX hints.
- Enabling suggestions negatively affects performance because they result in more complex queries to Solr.
Search Suggestions Count Enter the maximum number of suggestions to return. Show Results Count for Each Suggestion The default option, No, displays only the suggestion and not the number of results for each suggestion.
Click Yes to display the number of results for each suggestion.
Enable Search Recommendations Recommendations display terms related to a requested word or phrase on the search results page.
This functionality is not based on third party engine functionality, but is implemented as part of the Enterprise_Search module and can be shown with the Solr search suggestions block.
By default, Magento uses the Enterprise_Search_Model_Adapter_HttpStream module for recommendations. If you install the Apache Solr PHP extension, Magento automatically uses the Enterprise_Search_Model_Adapter_PhpExtension adapter instead. Both adapters function in the same way with no difference in performance. However, the PhpExtension adapter is not tested by Magento so you must thoroughly test any modifications you make to it before deploying it in a production environment.
Note: Enabling recommendations negatively affects
performance because they result in more complex queries to Solr and more database calls.Search Recommendations Count Enter the maximum number of recommendations to return. Show Results Count for Each Recommendation The default option, No, displays only the recommendation and not the number of results for each recommendation.
Click Yes to display the number of results for each recommendation.
Enable Solr Engine for Catalog Navigation Click Yes (the default) to use Solr to enable layered navigation in the category view.
Click No to use the database for layered navigation in the category view.
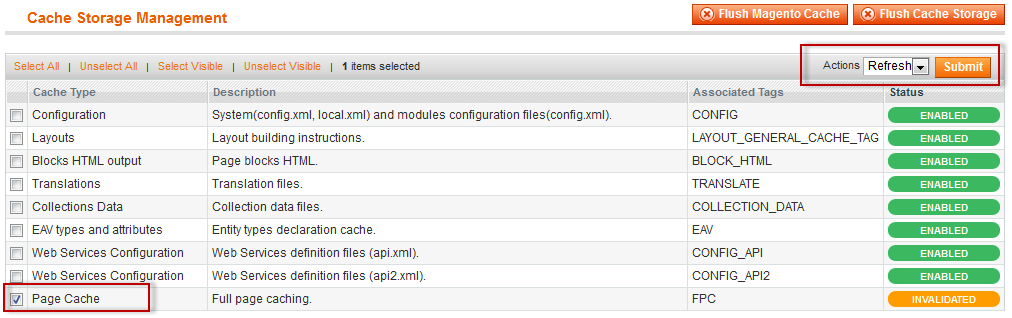
Reindexing Catalog Search and Refreshing the Full Page Cache
After you change the Solr configuration, you must reindex the catalog search index and refresh the full page cache as follows:
- In the Admin Panel, click System > Cache Management.
- Select the checkbox next to Page Cache.
- From the Actions list in the upper right, click Refresh.
The following figure shows an example.
- To update the catalog search index, open a command prompt window.
- Change to the shell subdirectory of your Magento installation directory.
For example, on CentOS:cd /var/www/html/magento/shell
- Enter the following command:
php indexer.php --reindex catalogsearch_fulltext
Scripting Solr Startup and Shutdown
In a production environment, you should start and stop Solr using a script.
Note: You must perform all tasks discussed in this section as a user with root privileges.Create a script named /etc/init.d/solr with options similar to the following:
#!/bin/sh

#Starts, stops, and restarts Apache Solr.
#chkconfig: 35 92 08
#description: Starts and stops Apache Solr

SOLR_DIR="[your Solr install dir]"
JAVA_OPTIONS="-Xmx1024m -DSTOP.PORT=jetty-stop-port -DSTOP.KEY=jetty-stop-key -jar  start.jar"
LOG_FILE="path-to-solr-log-file"
JAVA="java_home"

case $1 in
start)
echo -n "Starting Solr"
cd $SOLR_DIR
$JAVA $JAVA_OPTIONS 2> $LOG_FILE &
;;
stop)
echo -n "Stopping Solr"
cd $SOLR_DIR
$JAVA $JAVA_OPTIONS --stop
;;
restart)
$0 stop
sleep 1
$0 start
;;
*)
echo "Usage: $0 {start|stop|restart}" >&2
exit 1
;;
esac
All parameters shown in the following table are required.
Value Description [your Solr install dir] The absolute file system path to your Solr installation. (For example, /etc/solr/apache-solr-3.6.2 jetty-stop-port
jetty-stop-keySecurity parameters used to prevent malicious attempts to stop Jetty.
For -DSTOP.PORT=, specify any unused port.
For -DSTOP.KEY=, specify a string. If you omit a value for -DSTOP.KEY=, Jetty generates a random key you must enter to stop Jetty.
For more information, see Securing Jetty.
path-to-solr-log-file Absolute file system path to the Solr log file. (For example, /var/log/solr.log) java_home Absolute file system path to your Java executable. (For example, /usr/bin/java) An example follows:
#!/bin/sh

#Starts, stops, and restarts Apache Solr.
#chkconfig: 35 92 08
#description: Starts and stops Apache Solr

SOLR_DIR="/etc/solr/apache-solr-3.6.2/example"
JAVA_OPTIONS="-Xmx1024m -DSTOP.PORT=8079 -DSTOP.KEY=mykey -jar  start.jar"
LOG_FILE="/var/log/solr.log"
JAVA="/usr/bin/java"

case $1 in
start)
echo -n "Starting Solr"
cd $SOLR_DIR
$JAVA $JAVA_OPTIONS 2> $LOG_FILE &
;;
stop)
echo -n "Stopping Solr"
cd $SOLR_DIR
$JAVA $JAVA_OPTIONS --stop
;;
restart)
$0 stop
sleep 1
$0 start
;;
*)
echo "Usage: $0 {start|stop|restart}" >&2
exit 1
;;
esac
To complete the script:
- Make sure you saved the edited version of the script.
- Give the script executable permissions as follows:
chmod +x /etc/init.d/solr
- You can now start, stop, and restart Solr as follows:
- Start Solr: /etc/init.d/solr start
- Stop Solr: /etc/init.d/solr stop
- Restart Solr: /etc/init.d/solr restart
Next Steps
For additional information about Solr, see the following:
- For more information about performance, see "Using Solr as a Search Engine" in Maximizing Performance and Scalability with Magento Enterprise Edition
- Customize Solr