Before starting to use OAuth, you need to perform several steps in the Magento Admin Panel. These steps allow you to enable the OAuth functionality for further actions.
Working with Consumers
Adding a New Consumer
First, you need to create a Consumer in the Admin Panel. Creating a new consumer means registering the application. To do this, perform the following steps:
- On the Magento Admin Panel menu, select System > Web Services > REST - OAuth Consumers.
- On the OAuth Consumers page, click Add New in the top right corner to add a new consumer.
- The New Consumer page opens. The Key and Secret fields are filled automatically and cannot be edited. These values are generated automatically and will be used to identify the Consumer in Magento.
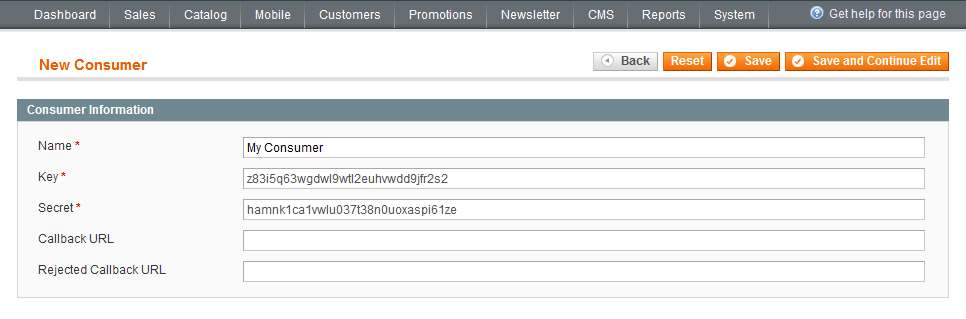
- Fill in the following fields:
- Name: Enter the name of the application to be registered. This field is required.
- Callback URL: Enter the URL address to which the Consumer will be redirected after the authorization is passed successfully. This URL address implies the path to the application. This field is optional.
- Rejected Callback URL: Enter the URL address to which the user will be redirected if he/she rejects authorization. This field is optional.
- Click Save in the top right corner to save the created Consumer.
Editing an Existing Consumer
To edit an existing consumer, perform the following steps:
- On the Magento Admin Panel menu, select System > Web Services > REST - OAuth Consumers.
- The OAuth Consumers page opens. In the grid, select the consumer to be edited and click it.
- The Edit Consumer page opens. On this page, you can edit the following fields:
- Name: Enter a new name for the application.
- Callback URL: Enter a new URL address to which the user will be redirected after successful authorization. This URL address implies the path to the application.
- Rejected Callback URL: Enter another URL address to which the user will be redirected after he/she rejects authorization proceeding.
The Key and Secret fields cannot be edited.
- Click Save in the top right corner to save changes.
Deleting an Existing Consumer
To delete the required consumer, perform the following steps:
- On the Magento Admin Panel menu, select System > Web Services > REST - OAuth Consumers.
- The OAuth Consumers page opens. In the grid, select the consumer to be deleted and click it.
- The Edit Consumer page opens. Click Delete in the top right corner to delete the selected consumer.
Searching for a Consumer
You can search for a required consumer by several parameters: ID, consumer name, and date of creation.
To search for a consumer, perform the following steps:
- On the Magento Admin Panel menu, select System > Web Services > REST - OAuth Consumers.
- The OAuth Consumers page opens. The list of consumers is displayed in a grid with the following fields: ID, Consumer Name, and Created At.
- In the search field below the column header in a grid, enter the required value by which the search will be performed. Click Search in the top right corner.
Working with Tokens (Admin Panel)
Viewing Authorized Tokens
To view authorized tokens in the Admin panel, perform the following steps:
- On the Magento Admin Panel menu, select System > Web Services > REST - OAuth Authorized Tokens.
- The Authorized OAuth Tokens page opens. In the grid, the list of all authorized tokens is displayed.
- Tokens are displayed in the grid with the following columns: ID, Application Name (name of consumer for which the token is created), User Type (type of the user, Customer or Admin), User ID, and the Revoked status.
From the Authorized OAuth Tokens page, you can enable, revoke, or delete the required token.
Viewing Applications
To view the list of applications, perform the following steps:
- On the Magento Admin Panel menu, select System > Web Services > REST - My Apps.
- The My Applications page opens. Registered applications are displayed in a grid with the following columns: ID, Application Name, and Revoked.
Enabling Tokens
If a token is revoked (the Yes value in the Revoked column on the Authorized OAuth Tokens page), you can enable it. To do this, perform the following steps:
- In the Authorized OAuth Tokens grid, select the token with the Revoked status set to Yes and select the checkbox next to it.
You can select more than one token with the Revoked status and enable all of them by using the mass action. - In the Actions drop-down list, select the Enable option and click Submit.
- The required token is enabled.
Revoking Tokens
If a token is enabled (the No value in the Revoked column), you can revoke it. To do this, perform the following steps:
- In the Authorized OAuth Tokens grid, select the token with the Revoked status set to No and select the checkbox next to it.
You can select more than one token with the Revoked status set to No and revoke all of them by using the mass action. - In the Actions drop-down list, select the Revoke option and click Submit.
- The required token is revoked.
Deleting Tokens
To delete the required token, perform the following steps:
- In the Authorized OAuth Tokens grid, select the token to be deleted and select the checkbox next to it.
You can select more than one token and delete all of them by using the mass action. - In the Actions drop-down list, select the Delete option and click Submit.
- The required token is deleted.
Working with Tokens (Frontend)
Viewing Applications
To view the authorized applications from the frontend, perform the following steps:
- On the frontend, click My Account and then select the My Applications tab on the left.
- On the My Applications page, the list of registered applications will be displayed.

From this page, you can enable, revoke, or delete the required token.
Enabling Tokens
- In the list of consumers, select the consumer to be enabled.
If the token is revoked, there will be the Disabled status next to it. - Click Enable next to the consumer name.
- The token is enabled.
Disabling Tokens
- In the list of consumers, select the consumer to be disabled.
If the token is enabled, there will be the Enabled status next to it. - Click Disable next to the consumer name.
- The token is disabled.
Deleting Tokens
- In the list of consumers, select the consumer to be deleted.
- Click Delete next to the consumer name.
- The token is deleted.
Working with Email Templates
Setting Up the Default Email Template
You can set the email template that will be used for user notification if the token status changes. Also, you can set different email templates for different store views. For example, you have two store views: English and German. Magento allows you to set one email template for the English store view and another one for the German store view.
To set the email template, perform the following steps:
- On the Admin Panel menu, select System > Configuration.
- Select Services > OAuth on the left.

- In the Email panel, from the Token Status Change Email Template drop-down list, select the required template and click Save Config in the top right corner.
- The template is saved.
Creating a New Email Template
You can also create your own email template that will be used for user notification if the token status changes.
To create a new template, perform the following steps:
- On the Admin Panel menu, select System > Transactional Emails.
- The Transactional Emails page opens. Click Add New Template in the top right corner.
- The New Email template page opens. In the Load default template panel, in the Template drop-down list, select the Token Status Change option.
- Specify the Locale option and click Load Template.
- In the Template Information panel, the template data is loaded. You can specify your own template name, subject, and content.
- When the email template is created, click Save Template in the top right corner.
- Set the newly created template as it was described above.
Cleanup Configuration
You can configure the cleanup functionality for temporary tokens. These tokens can be deleted after a certain period of time or after a certain number of OAuth requests.
To configure cleanup, perform the following steps:
- On the Admin Panel menu, select System > Configuration.
- Select Services > OAuth on the left.
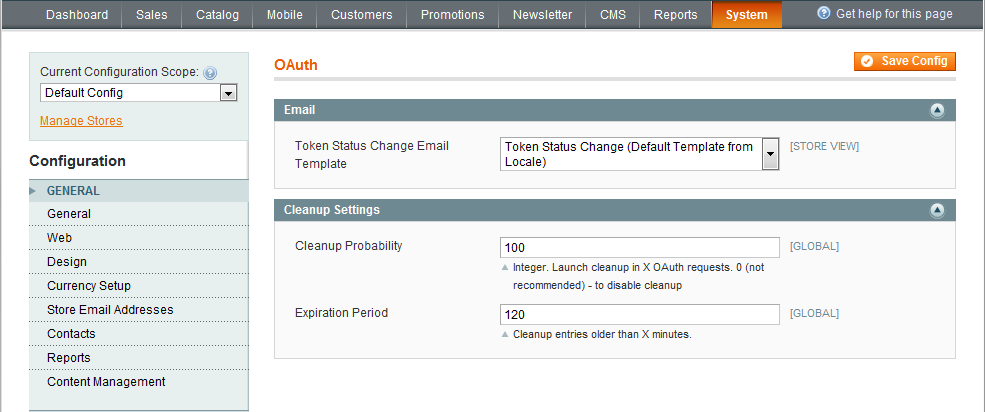
- In the Cleanup Statistics panel, you can set the following values:
- Cleanup Probability: Define the threshold of OAuth requests after which the cleanup will be performed. Only temporary credentials will be removed. Enter 0 to disable the cleanup.
- Expiration Period: Define the period (in minutes) on the expiry of which entries will be deleted from the database.
- Click Save Config in the top right corner to save changes.