
This article discusses how you upgrade to:
Because of changes to URL rewrites, the following upgrades are more complex than other upgrades.
This section discusses how to get ready for your upgrade by backing up the database and customizations on the file system. The steps that follow do not affect your current production system. You can continue serving customers with no downtime.
To get ready for your upgrade:
Complete the tasks discussed in the following sections in the order shown:
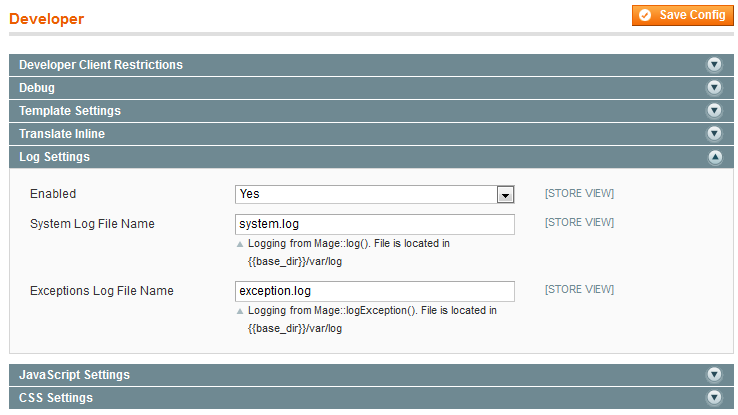
Before you start your upgrade, you should enable exception logging so it will be enabled on the development system. Without exception logging, it will be more difficult to diagnose errors during your upgrade. You can disable exception logging after you've exported the Magento database.
To enable exception logging:
Before upgrading to EE 1.13.0.2 or later, disable all running cron jobs. A simple way to stop cron jobs follows; consult an appropriate reference for other options.
As a user with root privileges, enter one of the following commands:
service crond stopservice cron stopThis section applies to upgrading Magento EE only. Skip this section if you're using Magento CE.
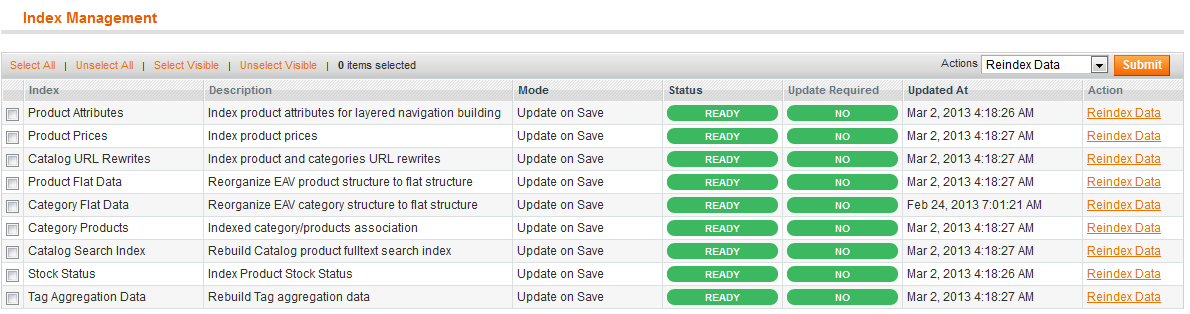
Because of the changes to indexing in Magento EE 1.13, you must set all indexers to update on save before you upgrade; otherwise, unpredictable performance will result. You can revert indexer settings after you've exported the Magento database.
To set indexers to update on save:

Clear the Magento cache as follows:
Back up your database using mysqldump or another tool. mysqldump syntax follows:
mysqldump -u root magento-database-name > export-file-name.sql
To archive your custom themes and extensions:
media directory and all subdirectories. For example,cd [your Magento install dir] tar -czf media.tgz media
[your Magento install dir]/app/design/frontend
[your Magento install dir]/skin/frontend
[your Magento install dir]/app/code/local
[your Magento install dir]/app/code/community
[your Magento install dir]/app/etc/local.xml to your development environment.After you've exported the Magento database and extensions, you can revert the configuration changes you made as discussed in these sections:
In your development environment:
magento subdirectory of that directory.magento subdirectory so if you want your Magento installation directory to be /var/www/magento, you don't need to do anything.magento using the following commands:mysql -u root -pEnter the remaining commands at the
mysql> prompt
create database magento;
GRANT USAGE ON *.* TO magento@localhost IDENTIFIED BY 'magento';
GRANT ALL ON magento.* TO magento@localhost;
For MySQL versions later than 5.0.2 but earlier than 5.1.6, the following command is required:
GRANT SUPER ON *.* TO 'magento'@'localhost';Exit the MySQL command shell:
exitVerify the database exists using the following command:
mysql -u magento -p magentoIf an error displays, repeat the commands. If the command succeeded, enter
exit to return to the command prompt.getenforceEnforcing displays to confirm that SELinux is running.setsebool -P httpd_can_network_connect=1Ubuntu
setsebool -P apache2_can_network_connect=1
PHP 5.3 is currently the latest PHP version available in the default repositories for Ubuntu and CentOS. PHP 5.3 works with CE 1.8, CE 1.9, EE 1.13, and EE 1.14.
We recommend PHP 5.4 for all of the preceding CE and EE versions because of the new features and changes in that release.
CE 1.8 and EE 1.13 both require a PHP 5.4 patch. The patch is listed as PHP 5.4 Compatibility in the EE support portal.
Use the instructions on phpave.
Enter the following commands in the order shown as a user with root privileges:
cd /tmp
rpm -Uvh http://download.fedoraproject.org/pub/epel/6/i386/epel-release-6-8.noarch.rpm
rpm -Uvh http://rpms.famillecollet.com/enterprise/remi-release-6.rpm
yum --enablerepo=remi install httpd php php-common
The following resources are also available:
Upgrade your Magento installation by completing all of the following tasks in the order shown:
Before attempting your Magento upgrade, complete all the tasks discussed in:
This section discusses how to extract the Magento archive in your development system and manually copy over your customizations, themes, and extensions.
/var/www/magento, copy the archive to /var/www.tar -zxf archive-namemedia archive, overwriting the installation archive. You created the media archive as discussed in Getting Ready For Your Upgrade.media directory and all subdirectories. If you copy the media archive to the Magento installation directory on your development system, extracting it automatically replaces existing media subdirectory contents.media directory and subdirectories to media directory in your new Magento installation, overwriting the existing contents.[your Magento install dir]/app/design/frontend and [your Magento install dir]/skin/frontend directories, as appropriate, overwriting the existing contents.[your Magento install dir]/app/code/local and [your Magento install dir]/app/code/community directories, as appropriate, overwriting the existing contents.This section discusses how to:
web/unsecure/base_url and web/secure/base_url in the core_config_data table to the development server's IP address or hostname.Import the production database data using your database manager tool.
mysql syntax follows:
mysql -u root -p database-name < database-export-filename.sqlFor example, if the database name is
magento and the database export file name is mangento-db-export.sql, enter
mysql -u root -p magento < mangento-db-export.sql
The following sections discuss how to change the base URL paths from http://prod.example.com to http://dev.example.com using SQL commands and phpmyadmin:
This section discusses how to update the secure and unsecure URLs of your webstores and store views in the Magento database. The following example assumes you have two URLs, which every Magento installation has by default. Depending on your setup, you could have more (for additional store views, Content Delivery Networks (CDNs) and so on.
Use the following procedure to update all matching URLs in the database.
To update the database with the development system's base URLs using SQL commands:
mysql -u root -pEnter the remaining commands at the mysql> prompt.
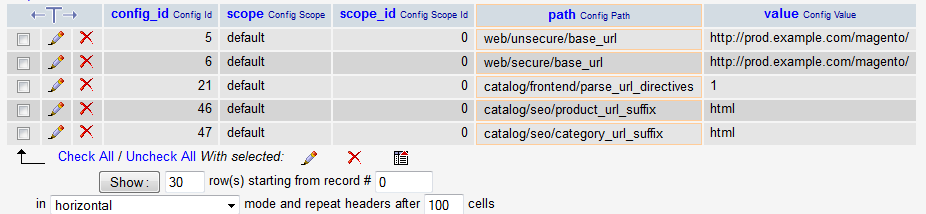
use magento-db-name;
SELECT * FROM core_config_data WHERE path LIKE '%base_url%';
web/unsecure/base_url and web/secure/base_url.config_id for these rows.web/unsecure/base_url and web/secure/base_url:
UPDATE core_config_data SET value='base-url' WHERE config_id=id1 or config_id=id2;Example 1—
config_ids are the same: if your base URL is http://dev.example.com/, the config_id of the row containing web/unsecure/base_url is 354 and the config_id of the row containing web/secure/base_url is 355, enter:
UPDATE core_config_data SET value='http://dev.example.com/' WHERE config_id=354 or config_id=355;Example 2—
config_ids are different: Same as preceding example except that web/secure/base_url uses https://
UPDATE core_config_data SET value='http://dev.example.com/' WHERE config_id=354;
UPDATE core_config_data SET value='https://dev.example.com/' WHERE config_id=355;
SELECT * FROM core_config_data WHERE path LIKE '%base_url%';
http://prod.example.com/view1/Make sure to update the URL like the following:
UPDATE core_config_data SET value='http://dev.example.com/view1/' WHERE config_id=377;
SELECT * FROM core_config_data WHERE path LIKE '%base_url%';
exit at the mysql> prompt and continue with Finishing the File System.This section discusses how to use phpmyadmin to change the values of the paths web/unsecure/base_url and web/secure/base_url in the core_config_data table to the development server's IP address or hostname.
dev-web-server-host-or-ip/phpmyadmin
For example, if your web server address is http://dev.example.com, enter
http://dev.example.com/phpmyadminroot user.%base_url% in the Value field.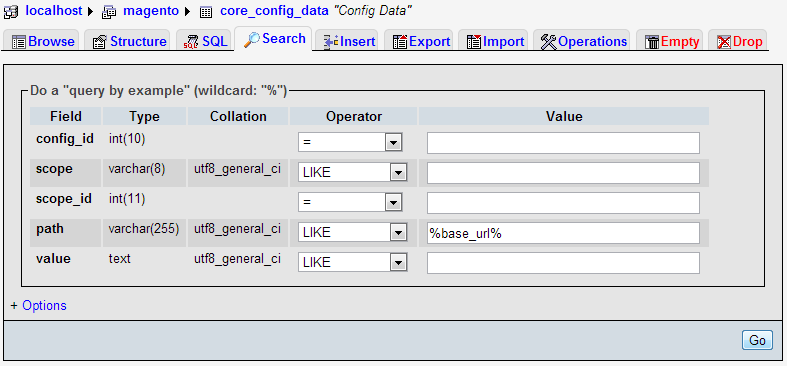
web/unsecure/base_url.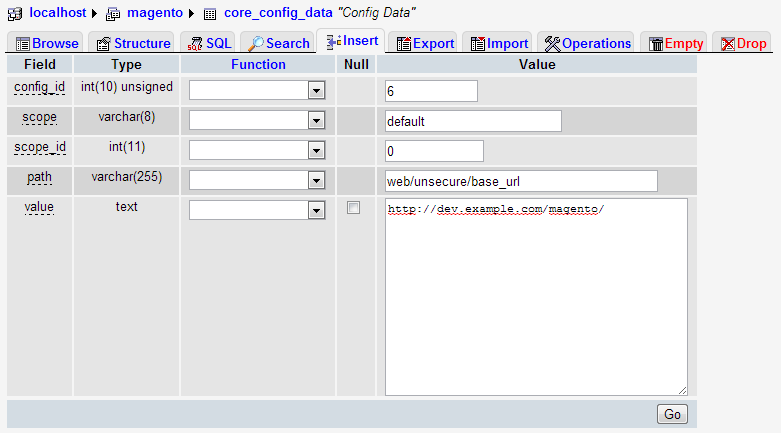
web/secure/base_url.This section applies to upgrading to EE 1.14.0.0 using the Solr search engine only. If you're upgrading to a different version—or if you're not using Solr—skip this section and continue with Finishing the File System.
Because of changes to the Solr schema, you must copy two files from Magento to your Solr installation. Failure to do so might prevent products from displaying on your web store. After copying the files, you must also reindex the catalog search index.
To update Solr:
[your Magento install dir]/lib/Apache/Solr/conf/schema.xml
[your Magento install dir]/lib/Apache/Solr/conf/solrconfig.xml
For example, if Magento is installed in /var/www/html/magento and the example Solr configuration is installed in the /etc/solr/apache-solr-3.6.2/example/solr/conf directory on the same host, enter:
cp /var/www/html/magento/lib/Apache/Solr/conf/solrconfig.xml /etc/solr/apache-solr-3.6.2/example/solr/conf
cp /var/www/html/magento/lib/Apache/Solr/conf/schema.xml /etc/solr/apache-solr-3.6.2/example/solr/conf
shell subdirectory of your Magento installation directory.cd /var/www/html/magento/shell
php indexer.php --reindex catalogsearch_fulltext
This section discusses how to edit copy local.xml and set file system permissions and ownership on the production system.
local.xml to [your Magento install dir]/app/etc.local.xml in a text editor.default_setup element, as follows:
<default_setup>
     <connection>
        <host><![CDATA[change-if-necessary]]></host>
        <username><![CDATA[change-if-necessary]]></username>
        <password><![CDATA[change-if-necessary]]></password>
        <dbname><![CDATA[change-if-necessary]]></dbname>
        <initStatements><![CDATA[SET NAMES utf8]]></initStatements>
        <model><![CDATA[mysql4]]></model>
        <type><![CDATA[pdo_mysql]]></type>
        <pdoType><![CDATA[]]></pdoType>
        <active>1</active>
     </connection>
</default_setup>
local.xml and exit the text editor.Magento recommends the following ownership and privilege settings for files and directories in the Magento installation directory:
root).drwx------).-rw-------).Note: The way you set permissions and ownership depends on whether Magento is running on a dedicated or hosted system:
root. The web server typically runs as an ordinary user. Magento assumes you log in as this user to start and stop the web server and that you already own all the files and directories in the Magento installation directory. You can use chmod to change permissions on files and directories.root and, as root, you can use the chown and chmod commands to set ownership and privileges in the Magento installation directory.To set privileges and ownership:
#Ubuntu example
cd /var/www/magento

#CentOS example
cd /var/www/html/magento
chown -R web-server-user-name .For example, on Ubuntu where Apache usually runs as
www-data, enter
chown -R www-data .
find . -type d -exec chmod 700 {} +
find . -type f -exec chmod 600 {} +If you're upgrading to EE 1.14 from EE 1.13.0.0 or 1.13.0.1, see EE 1.13.1.0 Upgrade: Running the EE 1.13.0.0 or EE 1.13.0.1 URL Redirect Script now. When you're done, return here to continue your upgrade.
To complete the upgrade, go to your Magento base URL in a web browser. The first time you go to your Magento base URL, server-side scripts run to update the database. Depending on the amount of data in your database, this process can take a long time.
If you're upgrading from a version earlier than CE 1.4 or EE 1.7, Magento strongly recommends the two-step upgrade approach discussed in Upgrade Path. In addition, you should expect the upgrade and testing process to take a long time and to expect more downtime for your production system.
Complete the following tasks in the order shown:
The first step in your upgrade is to run server-side upgrade scripts. Depending on the nature of your customizations and extensions, and how many customers and products are in your database, these scripts can take a long time to run and can result in exceptions. You must resolve all exceptions before continuing to the next step in the process.
This step in the upgrade process is iterative; that is, you'll probably run through it more than once.
To run the upgrade scripts:
[your Magento install dir]/var/log.var/ subdirectories:
rm -rf [your Magento install dir]/var/cache [your Magento install dir]/var/full_page_cache \
	[your Magento install dir]/var/locks [your Magento install dir]/var/session
This section applies to upgrading from 1.13.0.1 only. If you're upgrading CE or if you're upgrading from a different EE version, continue with Setting Up the Magento Cron Job.
After successfully running the Magento upgrade and fixing errors, enter the following command from the Magento root directory:
php -f shell/indexer.php -- --reindexall
This command runs a full reindex and it might take a long time, depending on the size of your database.
After the reindex completes, enter the following command from your Magento installation directory:
rm -rf var/cache var/full_page_cache var/locks
Continue with Setting Up Magento Cron Jobs.
If you're upgrading to EE 1.14 from EE 1.12 or earlier, see EE 1.14 Upgrade: Running the EE 1.12 and Earlier URL Redirect Script now. When you're done, return here to continue your upgrade.
You should now set up your Magento cron job as discussed here.
Run the following command to clean the Magento var/ subdirectories:
rm -rf [your Magento install dir]/var/cache [your Magento install dir]/var/full_page_cache [your Magento install dir]/var/locks
After the cron job runs, all indexers should be in a Ready status. Before testing your upgrade, verify all indexers are Ready; otherwise, your testing will be inconclusive.
To verify the status of indexers:
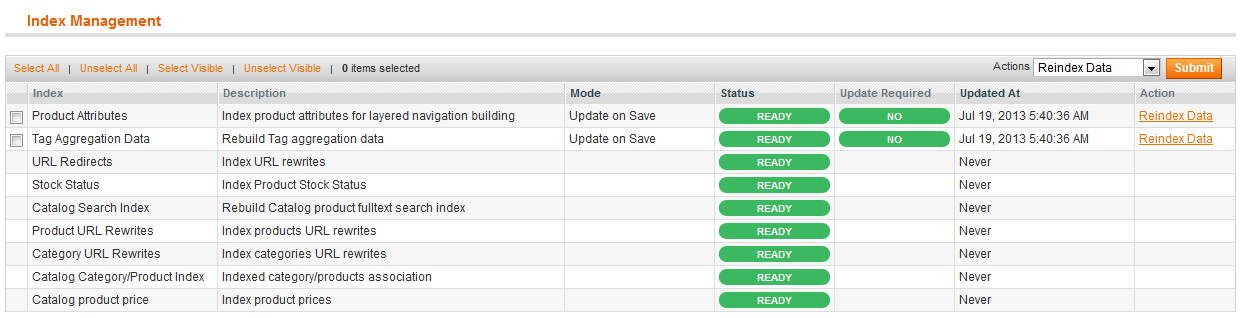
| Indexer status | Suggested action |
|---|---|
| Scheduled | Wait for cron to finish or run http://magento-host-name/cron.php from a web browser. |
| Processing | Wait for cron to finish or run If indexers are Processing for an extended period of time, run the command discussed in Clearing Magento var/ Subdirectories and refresh the Index Management page. |
After you have upgraded with no fatal errors or exceptions, Magento strongly recommends you thoroughly test the upgrade in your development environment as follows:
The last step in upgrading is to take your production system offline and switching to your development system—which then becomes the production system from that point on.
To switch from your production to development system:
[your Magento install dir]/maintenance.flag.The server is temporarily unable to service your request due to maintenance downtime or capacity problems. Please try again later.Congratulations! You successfully upgraded! Review our welcome page to see the improvements you're getting.
To secure your Magento installation after the upgrade, see After You Install Magento: Recommended File System Ownership and Privileges.
There is a known issue after upgrading to EE 1.13.1 that affects you only if you do not follow the recommended procedure to upgrade to a new environment as discussed in Getting Ready For Your Upgrade.
Symptom: After completing the upgrade, when you log in to the Admin Panel and click System > Configuration, a fatal error similar to the following displays in your browser:
Class 'Mage_Googlecheckout_Helper_Data' not found in /var/www/html/magento/app/Mage.php on line 547
Solution:
root privileges, delete all files except config.xml from the following directory:[your Magento install dir]/app/code/core/Mage/GoogleCheckout/etc
In the event of any other issue during the upgrade, see Getting Help With Your Installation or Upgrade.