Magento for Developers: Part 7—Advanced ORM: Entity Attribute Value
by Alan Storm, updated for Magento 1.12

by Alan Storm, updated for Magento 1.12
In the first ORM article we told you there were two kinds of Models in Magento. Regular, or "simple" Models, and Entity Attribute Value (or EAV) Models. We also told you this was a bit of a fib. Here's where we come clean.
ALL Magento Models interacting with the database inherit from the Mage_Core_Model_Abstract / Varien_Object chain. What makes something either a simple Model or an EAV Model is its Model Resource. While all resources extend the base Mage_Core_Model_Resource_Abstract class, simple Models have a resource that inherits from Mage_Core_Model_Resource_Db_Abstract, and EAV Models have a resource that inherits from Mage_Eav_Model_Entity_Abstract
If you think about it, this makes sense. As the end-programmer-user of the system you want a set of methods you can use to talk to and manipulate your Models. You don't care what the backend storage looks like, you just want to get properties and invoke methods that trigger business rules.
Entity-Attribute-Value model (EAV), also known as object-attribute-value model and open schema is a data model that is used in circumstances where the number of attributes (properties, parameters) that can be used to describe a thing (an "entity" or "object") is potentially very vast, but the number that will actually apply to a given entity is relatively modest. In mathematics, this model is known as a sparse matrix.
Another metaphor that helps me wrap my head around it is "EAV brings some aspects of normalization to the database table schema". In a traditional database, tables have a fixed number of columns
+------------------+
| products         |
+------------------+
| product_id       |
| name             |
| price            |
| etc..            |
+------------------+

+------------+----------------+------------------+---------+
| product_id | name           | price            | etc...  |
+------------+----------------+------------------+---------+
| 1          | Widget A       | 11.34            | etc...  |
+------------+----------------+------------------+---------+
| 2          | Dongle B       | 6.34             | etc...  |
+------------+----------------+------------------+---------+
Every product has a name, every product has a price, etc.
In an EAV Model, each "entity" (product) being modeled has a different set of attributes. EAV makes a lot of sense for a generic eCommerce solution. A store that sells laptops (which have a CPU speed, color, ram amount, etc) is going to have a different set of needs than a store that sells yarn (yarn has a color, but no CPU speed, etc.). Even within our hypothetical yarn store, some products will have length (balls of yarn), and others will have diameter (knitting needles).
There aren't many open source or commercial databases that use EAV by default. There are none that are available on a wide variety of web hosting platforms. Because of that, the Magento engineers have built an EAV system out of PHP objects that use MySQL as a data-store. In other words, they've built an EAV database system on top of a traditional relational database.
In practice this means any Model that uses an EAV resource has its attributes spread out over a number of MySQL tables.
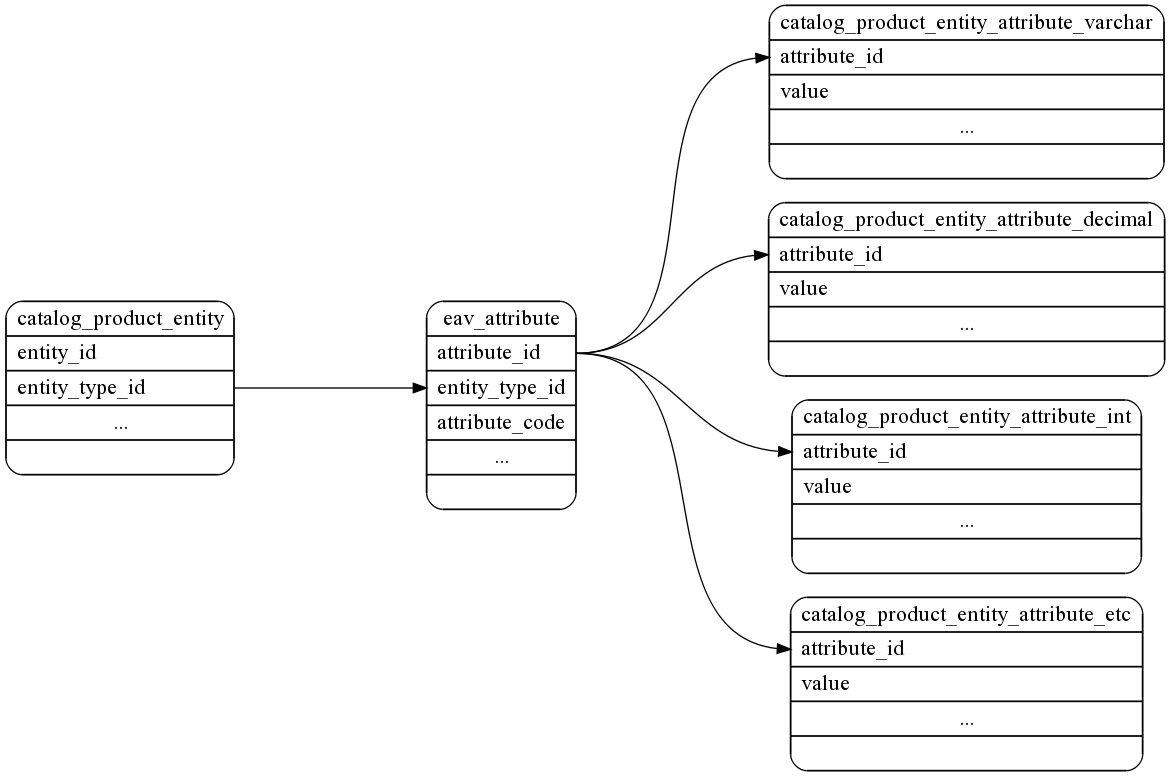
The above diagram is a rough layout of the database tables Magento consults when it looks up an EAV record for the catalog_product entity. Each individual product has a row in catalog_product_entity. All the available attributes in the entire system (not just for products) are stored in eav_attribute, and the actual attribute values are stored in tables with names like catalog_product_entity_varchar, catalog_product_entity_decimal, catalog_product_entity_etc..
Beyond the mental flexibility an EAV system gives you, there's also the practical benefit of avoiding ALTER TABLE statements. When you add a new attribute for your products, a new row is inserted into eav_attribute. In a traditional relational database/single-table system, you'd need to ALTER the actual database structure, which can be a time consuming/risky proposition for tables with large data-sets.
The downside is there's no one single simple SQL query you can use to get at all your product data. Several single SQL queries or one large join need to be made.
That's EAV in a nutshell. The rest of this articles is a run-through of what's needed to create a new EAV Model in Magento. It's the hairiest thing you'll read about Magento and it's something that 95% of people working with the system will never need to do. However, understanding what it takes to build an EAV Model Resource will help you understand what's going on with the EAV Resources that Magento uses.
Because the EAV information is so dense, we're going to assume you're already very familiar with Magento's MVC and grouped class name features. We'll help you along the way, but training wheels are off.
We're going to create another Model for a weblog post, but this time using an EAV Resource. To start with, setup and create a new module which responds at the following URL
http://example.com/complexworld
If you're unsure how to do this, be sure you've mastered the concepts in the previous tutorials.
Next, we'll create a new Model named Weblogeav. Remember, it's the Resource that's considered EAV. We design and configure our Model the exact same way, so let's configure a Model similar to one we created in the first ORM article.
<global>
    <!-- ... -->
    <models>
        <!-- ... -->
        <complexworld>
            <class>Magentotutorial_Complexworld_Model</class>
            <resourceModel>complexworld_resource</resourceModel>
        </complexworld>
        <!-- ... -->
    </models>
    <!-- ... -->
</global>
You'll notice so far there is no difference to setting up a regular Model and flat table resource Model.
We'll still need to let Magento know about this resource. Similar to basic Models, EAV Resources are configured in the same <model/> node with everything else.
<global>
    <!-- ... -->
    <models>
        <!-- ... -->
        <complexworld_resource>
            <class>Magentotutorial_Complexworld_Model_Resource</class>
            <entities>
                <eavblogpost>
                    <table>eavblog_posts</table>
                </eavblogpost>
            </entities>
        </complexworld_resource>
        <!-- ... -->
    </models>
    <!-- ... -->
</global>
Again, so far this is setup similar to our regular Model Resource. We provide a <class/> that configures a PHP class, as well as an <entities/> section that will let Magento know the base table for an individual Model we want to create. The <eavblogpost/> tag is the name of the specific Model we want to create, and its inner <table/> tag specifies the base table this Model will use (more on this later).
Until wide adoption of PHP 5.3 and namespaces, one of the trickier (and tedious) parts of Magento will remain remembering how <classname/>s relate to file paths, and then ensuring you create the correctly named directory structure and class files. After configuring any <classname/>s or URIs, you may find it useful to attempt to instantiate an instance of the class in a controller without first creating the class files. This way PHP will throw an exception telling me it can't find a file, along with the file location. Give the following a try in your Index Controller.
public function indexAction() {
    $weblog2 = Mage::getModel('complexworld/eavblogpost');
    $weblog2->load(1);
    var_dump($weblog2);
}
As predicted, a warning should be thrown
Warning: include(Magentotutorial/Complexworld/Model/Eavblogpost.php) [function.include]:
failed to open stream: No such file or directory  in /Users/username/Sites/magento.dev/lib/Varien/Autoload.php on line 93
In addition to telling us the path where we'll need to define the new resource class this also serves as a configuration check. If we'd been warned with the following
Warning: include(Mage/Complexworld/Model/Eavblogpost.php) [function.include]:
failed to open stream: No such file or directory  in /Users/username/Sites/magento.dev/lib/Varien/Autoload.php on line 93
we'd know our Model was misconfigured, as Magento was looking for the Model in code/core/Mage instead of code/local/Magentotutorial.
So, lets create our Model class
File: app/code/local/Magentotutorial/Complexworld/Model/Eavblogpost.php:
class Magentotutorial_Complexworld_Model_Eavblogpost extends Mage_Core_Model_Abstract {
    protected function _construct()
    {
        $this->_init('complexworld/eavblogpost');
    }
}
Remember, the Model itself is resource independent. A regular Model and an EAV Model both extend from the same class. It's the resource that makes them different.
Clear your Magento cache, reload your page, and you should see a new warning.
Warning: include(Magentotutorial/Complexworld/Model/Resource/Eavblogpost.php)
As expected, we need to create a class for our Model's resource. Let's do it!
File: app/code/local/Magentotutorial/Complexworld/Model/Resource/Eavblogpost.php:
class Magentotutorial_Complexworld_Model_Resource_Eavblogpost extends Mage_Eav_Model_Entity_Abstract
{
    protected function _construct()
    {
        $resource = Mage::getSingleton('core/resource');
        $this->setType('complexworld_eavblogpost');
        $this->setConnection(
            $resource->getConnection('complexworld_read'),
            $resource->getConnection('complexworld_write')
        );
    }
}
So, already we're seeing a few differences between a simple Model Resource and an EAV Model Resource. First off, we're extending the Mage_Eav_Model_Entity_Abstract class. While Mage_Eav_Model_Entity_Abstract uses the same _construct concept as a regular Model Resource, there's no _init method. Instead, we need to handle the init ourselves. This means telling the resource what connection-resources it should use, and passing a unique identifier into the setType method of our object.
Another difference in Mage_Eav_Model_Entity_Abstract is _construct is not an abstract method, primarily for reasons of backwards compatibility with older versions of the system.
So, with that, let's clear the Magento cache and reload the page. You should see a new exception which reads
Invalid entity_type specified: complexworld_eavblogpost
Magento is complaining that it can't find a entity_type named complexworld_eavblogpost. This is the value you set above
$this->setType('complexworld_eavblogpost');
Every entity has a type. Types will, among other things, let the EAV system know which attributes a Model uses, and allow the system to link to tables that store the values for attributes. We'll need to let Magento know that we're adding a new entity type. Take a look in the MySQL table named eav_entity_type.
mysql> select * from eav_entity_type;
*************************** 1. row ***************************
          entity_type_id: 1
        entity_type_code: customer
            entity_model: customer/customer
         attribute_model:
            entity_table: customer/entity
      value_table_prefix:
         entity_id_field:
         is_data_sharing: 1
        data_sharing_key: default
default_attribute_set_id: 1
         increment_model: eav/entity_increment_numeric
     increment_per_store: 0
    increment_pad_length: 8
      increment_pad_char: 0
*************************** 2. row ***************************
          entity_type_id: 2
        entity_type_code: customer_address
            entity_model: customer/customer_address
         attribute_model:
            entity_table: customer/address_entity
      value_table_prefix:
         entity_id_field:
         is_data_sharing: 1
        data_sharing_key: default
default_attribute_set_id: 2
         increment_model:
     increment_per_store: 0
    increment_pad_length: 8
      increment_pad_char: 0
This table contains a list of all the entity_types in the system. The unique identifier complexworld_eavblogpost corresponds to the entity_type_code column.
This illustrates the single most important Magento concept, one that many people struggle to learn.
Consider the computer in front of you. The OS (Mac OS X, Windows, Linux, etc.) is the software system. Your web browser (Firefox, Safari, IE, Opera) is the application. Magento is a system first, and an application second. You build eCommerce applications using the Magento system. What gets confusing is, there's a lot of places in Magento where the system code is exposed in a really raw form to the application code. The EAV system configuration living in the same database as your store's data is an example of this.
If you're going to get deep into Magento, you need to treat it like it's an old Type 650 machine. That is to say, it's the kind of thing you can't effectively program applications in unless unless you have a deep understanding of the system itself.
So, it's theoretically possible to manually insert the rows you'll need into the Magento database to get your Model working, but it's not recommended. Fortunately, Magento provides a specialized Setup Resource that provides a number of helper method that will automatically create the needed records to get the system up and running.
So, for starters, configure the Setup Resource like you would any other.
<global>
    <!-- ... -->
    <resources>
        <complexworld_setup>
            <setup>
                <module>Magentotutorial_Complexworld</module>
                <class>Magentotutorial_Complexworld_Model_Resource_Setup</class>
            </setup>
        </complexworld_setup>
    </resources>
    <!-- ... -->
</global>
Next, create its class file.
File: app/code/local/Magentotutorial/Complexworld/Model/Resource/Setup.php:
class Magentotutorial_Complexworld_Model_Resource_Setup extends Mage_Eav_Model_Entity_Setup {
}
Take note that we're extending from Mage_Eav_Model_Entity_Setup rather than Mage_Core_Model_Resource_Setup.
Finally, we'll set up our installer script. If you're not familiar with the naming conventions here, you'll want to review the setup resource tutorial on Setup Resources.
File: app/code/local/Magentotutorial/Complexworld/sql/complexworld_setup/install-0.1.0.php:
<?php
$installer = $this;
throw new Exception("This is an exception to stop the installer from completing");
Clear your Magento Cache, reload you page, and the above exception should be thrown, meaning you've correctly configured your Setup Resource.
NOTE: We'll be building up our install script piece by piece. If you've read the previous tutorial, you'll know you need to remove the setup's row from the core_resource table and clear your cache to make an installer script re-run. For the remainder of this tutorial, please remember that anytime we add or remove an item from our installer and re-run it, you'll need to remove this row from the database and clear your Magento cache. Normally you would create this file and run it once, a tutorial is something of an edge case.
To begin, add the following to your Setup Resource installer script, and then run the script by loading any page (after removing the above exception)
$installer = $this;
$installer->startSetup();
$installer->addEntityType('complexworld_eavblogpost', array(
    //entity_mode is the URI you'd pass into a Mage::getModel() call
    'entity_model'    => 'complexworld/eavblogpost',

    //table refers to the resource URI complexworld/eavblogpost
    //<complexworld_resource>...<eavblogpost><table>eavblog_posts</table>
    'table'           =>'complexworld/eavblogpost',
));
$installer->endSetup();
We're calling the addEntityType method on our installer object. This method allows us to pass in the entity type (complexworld_eavblogpost) along with a list of parameters to set its default values. If you've run this script, you'll notice new rows in the eav_attribute_group, eav_attribute_set, and eav_entity_type tables.
So, with that in place, if we reload our complexworld page, we'll get a new error.
SQLSTATE[42S02]: Base table or view not found: 1146 Table 'magento.eavblog_posts' doesn't exist
So, we've told Magento about our new entity type. Next, we need to add the MySQL tables that will be used to store all the entity values, as well as configure the system so it knows about these tables.
Our EAV Setup Resource has a method named createEntityTables which will automatically setup the tables we need, as well as add some configuration rows to the system. Let's add the following line to our setup resource.
$installer->createEntityTables(
    $this->getTable('complexworld/eavblogpost')
);
The createEntityTables method accepts two parameters. The first is the base table name, the second is a list of options. We're using the Setup Resource's getTable method to pull the table name from our config. If you've been following along, you know this should resolve to the string eavblog_posts. We've omitted the second parameter which is an array of options you'll only need to used it for advanced situations that are beyond the scope of this tutorial.
After running the above script, you should have the following new tables in your database
eavblog_posts
eavblog_posts_char
eavblog_posts_datetime
eavblog_posts_decimal
eavblog_posts_int
eavblog_posts_text
eavblog_posts_varchar
You'll also have an additional row in the eav_attribute_set table
mysql> select * from eav_attribute_set order by attribute_set_id DESC LIMIT 1 \G
*************************** 1. row ***************************
  attribute_set_id: 65
    entity_type_id: 37
attribute_set_name: Default
        sort_order: 6
So, let's go back to our page and reload.
http://example.com/complexworld
Success! You should see no errors or warnings, and a dumped Magentotutorial_Complexworld_Model_Eavblogpost --- with no data.
The last step we need to take in our Setup Resource is telling Magento what attributes we want our EAV Model to have. This would be equivalent to adding new columns in a single database table setup. Again, the Setup Resource will help us. The method we're interested in is addAttribute.
The code from the previous section was simply telling Magento about a type of entity that we add to the system. These next bits of code are what will actually add possible attributes for our new type to the system.
We do that with the method addAttribute. When we call addAttribute, Magento will need to do several things to install your entities.
To start with, we'll give our Eavblogpost a single attribute named title.
/* ... */
$this->addAttribute('complexworld_eavblogpost', 'title', array(
    //the EAV attribute type, NOT a MySQL varchar
    'type'              => 'varchar',
    'label'             => 'Title',
    'input'             => 'text',
    'class'             => '',
    'backend'           => '',
    'frontend'          => '',
    'source'            => '',
    'required'          => true,
    'user_defined'      => true,
    'default'           => '',
    'unique'            => false,
));
/* ... */
All right, that's a small pile of code. Let's break it apart.
The first argument to addAttribute is the entity type code. It has to match the code specified when calling addEntityType. It tells Magento which entity we are adding the attribute to, in our example it is our complexworld_eavblogpost entity. To see other available entities that come shipped with Magento, remember you can look into the eav_entity_type table at the entity_type_code column.
The second argument to addAttribute is the attribute code. It has to be unique within the given entity.
The third argument is where it get real interesting. This is an array of key value pairs, describing the attribute properties. For the sake of simplicity we've chose to define a single attribute, but you could go on to define as many as you'd like, by adding additional addAttribute calls to the setup script.
Finally, we have a long list of attribute properties.
//the EAV attribute type, NOT a MySQL varchar
'type'              => 'varchar',
'label'             => 'Title',
'input'             => 'text',
'class'             => '',
'backend'           => '',
'frontend'          => '',
'source'            => '',
'required'          => true,
'user_defined'      => true,
'default'           => '',
'unique'            => false,
Most of these define how Magento would build a backend form element for this attribute, and probably you'll won't have to deal with the,. That said, the one important property you'll want to make note of is
'type' => 'varchar'
This defines the type of the value that the attribute will contain. You'll recall that we added table for each attribute type
eavblog_posts_datetime
eavblog_posts_decimal
eavblog_posts_int
eavblog_posts_text
eavblog_posts_varchar
While these do not refer to the MySQL column types, (but instead the EAV attribute types), their names (varchar, datetime, etc.) are indicative of the values they'll hold.
All of these attribute properties are optional, if we wouldn't have specified them, Magento would have used a default value. These default values are defined in the _prepareValues method of the Mage_Eav_Model_Entity_Setup class (inherited by our setup class).
// Mage_Eav_Model_Entity_Setup
protected function _prepareValues($attr)
{
    $data = array(
        'backend_model'   => $this->_getValue($attr, 'backend'),
        'backend_type'    => $this->_getValue($attr, 'type', 'varchar'),
        'backend_table'   => $this->_getValue($attr, 'table'),
        'frontend_model'  => $this->_getValue($attr, 'frontend'),
        'frontend_input'  => $this->_getValue($attr, 'input', 'text'),
        'frontend_label'  => $this->_getValue($attr, 'label'),
        'frontend_class'  => $this->_getValue($attr, 'frontend_class'),
        'source_model'    => $this->_getValue($attr, 'source'),
        'is_required'     => $this->_getValue($attr, 'required', 1),
        'is_user_defined' => $this->_getValue($attr, 'user_defined', 0),
        'default_value'   => $this->_getValue($attr, 'default'),
        'is_unique'       => $this->_getValue($attr, 'unique', 0),
        'note'            => $this->_getValue($attr, 'note'),
        'is_global'       => $this->_getValue($attr, 'global',
                                 Mage_Catalog_Model_Resource_Eav_Attribute::SCOPE_GLOBAL
                             ),
    );

    return $data;
}
The second argument to the method calls to _getValue is the array key from our addAttribute argument array, and the third is the default value. So by default Magento would assume you are adding a varchar attribute with a text input.
Lets add attributes for the blog post content and the post date. This is what the complete install script looks like.
    $installer = $this;
    $installer->startSetup();

    $installer->addEntityType('complexworld_eavblogpost', array(
        //entity_mode is the URI you'd pass into a Mage::getModel() call
        'entity_model'    => 'complexworld/eavblogpost',

        //table refers to the resource URI complexworld/eavblogpost
        //<complexworld_resource>...<eavblogpost><table>eavblog_posts</table>
        'table'           =>'complexworld/eavblogpost',
    ));

    $installer->createEntityTables(
        $this->getTable('complexworld/eavblogpost')
    );

    $this->addAttribute('complexworld_eavblogpost', 'title', array(
        //the EAV attribute type, NOT a MySQL varchar
        'type'              => 'varchar',
        'label'             => 'Title',
        'input'             => 'text',
        'class'             => '',
        'backend'           => '',
        'frontend'          => '',
        'source'            => '',
        'required'          => true,
        'user_defined'      => true,
        'default'           => '',
        'unique'            => false,
    ));
    $this->addAttribute('complexworld_eavblogpost', 'content', array(
        'type'              => 'text',
        'label'             => 'Content',
        'input'             => 'textarea',
    ));
    $this->addAttribute('complexworld_eavblogpost', 'date', array(
        'type'              => 'datetime',
        'label'             => 'Post Date',
        'input'             => 'datetime',
        'required'          => false,
    ));

    $installer->endSetup();
So, now that we have everything in place, lets refresh things one last time to run our installer script. After calling addAttribute, we should have
This is clearly the lamest.blogmodel.ever, but lets try adding some rows and iterating through a collection and get the heck out of here before our heads explode. Add the following two actions to your Index Controller.
public function populateEntriesAction() {
    for ($i=0;$i<10;$i++) {
        $weblog2 = Mage::getModel('complexworld/eavblogpost');
        $weblog2->setTitle('This is a test '.$i);
        $weblog2->setContent('This is test content '.$i);
        $weblog2->setDate(now());
        $weblog2->save();
    }

    echo 'Done';
}

public function showCollectionAction() {
    $weblog2 = Mage::getModel('complexworld/eavblogpost');
    $entries = $weblog2->getCollection()
        ->addAttributeToSelect('title')
        ->addAttributeToSelect('content');
    $entries->load();
    foreach($entries as $entry)
    {
        // var_dump($entry->getData());
        echo '<h2>' . $entry->getTitle() . '</h2>';
        echo '<p>Date: ' . $entry->getDate() . '</p>';
        echo '<p>' . $entry->getContent() . '</p>';
    }
    echo '</br>Done</br>';
}
Let's populate some entries! Load up the following URL
http://magento.dev/index.php/complexworld/index/populateEntries
If you take a look at your database, you should see 10 new rows in the eavblog_posts table.
mysql> SELECT * FROM eavblog_posts ORDER BY entity_id DESC;
+-----------+----------------+------------------+--------------+-----------+----------+---------------------+---------------------+-----------+
| entity_id | entity_type_id | attribute_set_id | increment_id | parent_id | store_id | created_at          | updated_at          | is_active |
+-----------+----------------+------------------+--------------+-----------+----------+---------------------+---------------------+-----------+
|        10 |             31 |                0 |              |         0 |        0 | 2009-12-06 08:36:41 | 2009-12-06 08:36:41 |         1 |
|         9 |             31 |                0 |              |         0 |        0 | 2009-12-06 08:36:41 | 2009-12-06 08:36:41 |         1 |
|         8 |             31 |                0 |              |         0 |        0 | 2009-12-06 08:36:41 | 2009-12-06 08:36:41 |         1 |
|         7 |             31 |                0 |              |         0 |        0 | 2009-12-06 08:36:41 | 2009-12-06 08:36:41 |         1 |
|         6 |             31 |                0 |              |         0 |        0 | 2009-12-06 08:36:41 | 2009-12-06 08:36:41 |         1 |
|         5 |             31 |                0 |              |         0 |        0 | 2009-12-06 08:36:41 | 2009-12-06 08:36:41 |         1 |
|         4 |             31 |                0 |              |         0 |        0 | 2009-12-06 08:36:41 | 2009-12-06 08:36:41 |         1 |
|         3 |             31 |                0 |              |         0 |        0 | 2009-12-06 08:36:41 | 2009-12-06 08:36:41 |         1 |
|         2 |             31 |                0 |              |         0 |        0 | 2009-12-06 08:36:41 | 2009-12-06 08:36:41 |         1 |
|         1 |             31 |                0 |              |         0 |        0 | 2009-12-06 08:36:41 | 2009-12-06 08:36:41 |         1 |
+-----------+----------------+------------------+--------------+-----------+----------+---------------------+---------------------+-----------+
as well as 10 new rows in the eavblog_posts_varchar table.
mysql> SELECT * FROM eavblog_posts_varchar ORDER BY value_id DESC;
+----------+----------------+--------------+----------+-----------+------------------+
| value_id | entity_type_id | attribute_id | store_id | entity_id | value            |
+----------+----------------+--------------+----------+-----------+------------------+
|       10 |             31 |          933 |        0 |        10 | This is a test 9 |
|        9 |             31 |          933 |        0 |         9 | This is a test 8 |
|        8 |             31 |          933 |        0 |         8 | This is a test 7 |
|        7 |             31 |          933 |        0 |         7 | This is a test 6 |
|        6 |             31 |          933 |        0 |         6 | This is a test 5 |
|        5 |             31 |          933 |        0 |         5 | This is a test 4 |
|        4 |             31 |          933 |        0 |         4 | This is a test 3 |
|        3 |             31 |          933 |        0 |         3 | This is a test 2 |
|        2 |             31 |          933 |        0 |         2 | This is a test 1 |
|        1 |             31 |          933 |        0 |         1 | This is a test 0 |
+----------+----------------+--------------+----------+-----------+------------------+
Notice that eavblog_posts_varchar is linked to eavblog_posts by the entity_id column.
Finally, let's pull our Models back out. Load the following URL in your browser
http://magento.dev/index.php/complexworld/index/showCollection
This should give us a
Warning: include(Magentotutorial/Complexworld/Model/Resource/Eavblogpost/Collection.php) [function.include]:
  failed to open stream: No such file or directory  in /Users/username/Sites/magento.dev/lib/Varien/Autoload.php on line 93
So Close! We didn't make a class for our collection object! Fortunately, doing so is just as easy as with a regular Model Resource. Add the following file with the following contents
File: Magentotutorial/Complexworld/Model/Resource/Eavblogpost/Collection.php:
class Magentotutorial_Complexworld_Model_Resource_Eavblogpost_Collection extends Mage_Eav_Model_Entity_Collection_Abstract
{
    protected function _construct()
    {
        $this->_init('complexworld/eavblogpost');
    }
}
This is just a standard Magento _construct method to initialize the Model. With this in place, reload the page, and we'll see all the titles and the content outputted. But notice, the date value is missing!
Those of you with sharp eyes may have noticed something slightly different about the collection loading.
$entries = $weblog2->getCollection()
    ->addAttributeToSelect('title')
    ->addAttributeToSelect('content');
Because querying for EAV data can be SQL intensive, you'll need to specify which attributes it is you want your Models to fetch for you. This way the system can make only the queries it needs. If you're willing to suffer the performance consequences, you can use a wild card to grab all the attributes
$entries = $weblog2->getCollection()->addAttributeToSelect('*');
So, that should give you enough information to be dangerous, or at least enough information so you're not drowning the next time you're trying to figure out why the yellow shirts aren't showing up in your store. There's still plenty to learn about EAV; here's a few topics I would have liked to cover in greater detail, and may talk about in future articles
EAV Models are, without a doubt, the most complicated part of the Magento system that an ecommerce web developer will need to deal with. Remember to take deep breaths and that, at the end of the day, its just programming. Everything happens for a concrete reason, you just need to figure out why.