
Responsive Email Developer's Guide for Magento EE 1.14.1 and Magento CE 1.9.1
by Erik Hansen
Table of Contents
- Introduction
- Using cron to Send Emails
- Supported Email Clients and Devices
- Important Information about Upgrading
- Customizing the Header or Footer in Transactional Emails
- Customizing CSS Styles for Emails
- Using a High-Resolution Logo
- Using Contact Information in Transaction Emails
- Localizing Transactional Emails
- Using Updated Newsletter Templates
- Getting Help
Introduction
We improved transactional emails and newsletter templates in Magento Enterprise 1.14.1 and Magento Community 1.9.1 in a number of ways, including:
- Emails are now optimized for any screen size, including mobile and tablet devices
- Header and footer content for transactional emails are now contained in their own files
- CSS is now contained in separate CSS files
- We provide you with a responsive sample newsletter template
Using cron to Send Emails
Starting in Magento EE 1.14.1 and CE 1.9.1, your Magento cron job sends all emails, including transactional emails. You must configure cron for emails to work.
For more information, see Setting Up Cron Jobs.
Supported Email Clients and Devices
We tested responsive emails using a combination of real devices and Litmus. Due to the greatly varied level of support among email clients for modern web technologies, not all email clients rendered the emails perfectly. However, all of the following clients should render the emails in a manner that allows them to be easily read without obvious issues. Refer to the following sections for more information.
Supported Desktop Clients
| Operating system | Clients supported |
|---|---|
| OS X 10.8 | Apple Mail 6 |
| OS X 10.7 | Outlook 2011 |
|
|
Supported Mobile Clients
| Operating system | Clients supported |
|---|---|
| Android 4.2 ("Jelly Bean") | Native email app |
| Android 2.3 ("Gingerbread") | Native email app |
| Gmail App (Android 4.2) | Native email app |
| Blackberry 5 OS | Native email app |
| iOS 8 |
|
| iOS 7 |
|
| iOS 6 |
Mail on these devices:
|
Supported Web Clients
| Email application | Browsers supported* |
|---|---|
| AOL Mail |
|
| Gmail |
|
| Yahoo! Mail |
|
| Outlook.com |
|
*The latest version of each browser was used for testing.
Important Information about Upgrading
This section applies to anyone who used transactional emails in a version earlier than EE 1.14.1 or CE 1.9.1.
After upgrading from an earlier Magento version, you should preview your transactional emails, looking for changes in the logo, fonts, and styles. Because of changes introduced in this release, you might notice some differences.
Also, in CE 1.9.1 and EE 1.14.1 for the first time, you must specify a height and width for your logo image; the dimensions must be set to the area in which the logo displays. For more information, see Using a High-Resolution Logo.
Customizing the Header or Footer in Transactional Emails
In earlier Magento CE and EE versions, each transactional email template contained a copy of the HTML for the header and footer. To make it easier to customize transactional emails, the header and footer HTML is now centralized in the following template files:
[your Magento install dir]/app/locale/en_US/template/email/html/header.html[your Magento install dir]/app/locale/en_US/template/email/html/footer.html
The header and footer template files get included in the transactional emails using a new
template directive. For an example of how this works, open
app/locale/en_US/template/email/account_new.html. It contains two directives that include
header.html and footer.html:
{{template config_path="design/email/header"}}
{{template config_path="design/email/footer"}}
You can customize the header and footer as discussed in the following sections:
- Customizing Header and Footer Templates Using Files
- Customizing Header and Footer Templates Using the Magento Admin Panel
Customizing Header and Footer Templates Using Files
If you can access the Magento server file system, you can customize the header and footer by editing the following files:
[your Magento install dir]/app/locale/en_US/template/email/html/header.html[your Magento install dir]/app/locale/en_US/template/email/html/footer.html
Customizing Header and Footer Templates Using the Magento Admin Panel
You must use the Magento Admin Panel to customize header and footer templates if any of the following are true:
- You cannot access the Magento server file system
- To customize the templates for a unique website, store, or store view
The example discussed in the following sections shows how to customize the header template. You can use the same procedure to customize the footer as well.
Using custom templates is a two-step process: first, define the template, and second, specify the website or store view on which it's used. See one of the following sections for more information:
Customizing the Template in the Admin Panel
- Log in to the Magento Admin Panel as an administrator.
- Click System > Transactional Emails.
- On the Transactional Emails page, click Add New Template.
- From the Template list, click Email - Header.
- From the Locale list, click the template's locale.
- Click Load Template.
- Enter the following information:
Item Description Template Name field Enter a name for the new template, such as My HeaderTemplate Subject field Ignore; this field isn't used. Insert Variable Button Click to see a list of variables to insert. For more information about variables, see the Magento User Guide. Template Content field Enter the contents of your email template. Template Styles field Ignore; this field is not supported when customizing the header and footer templates.
The following figure shows an example:
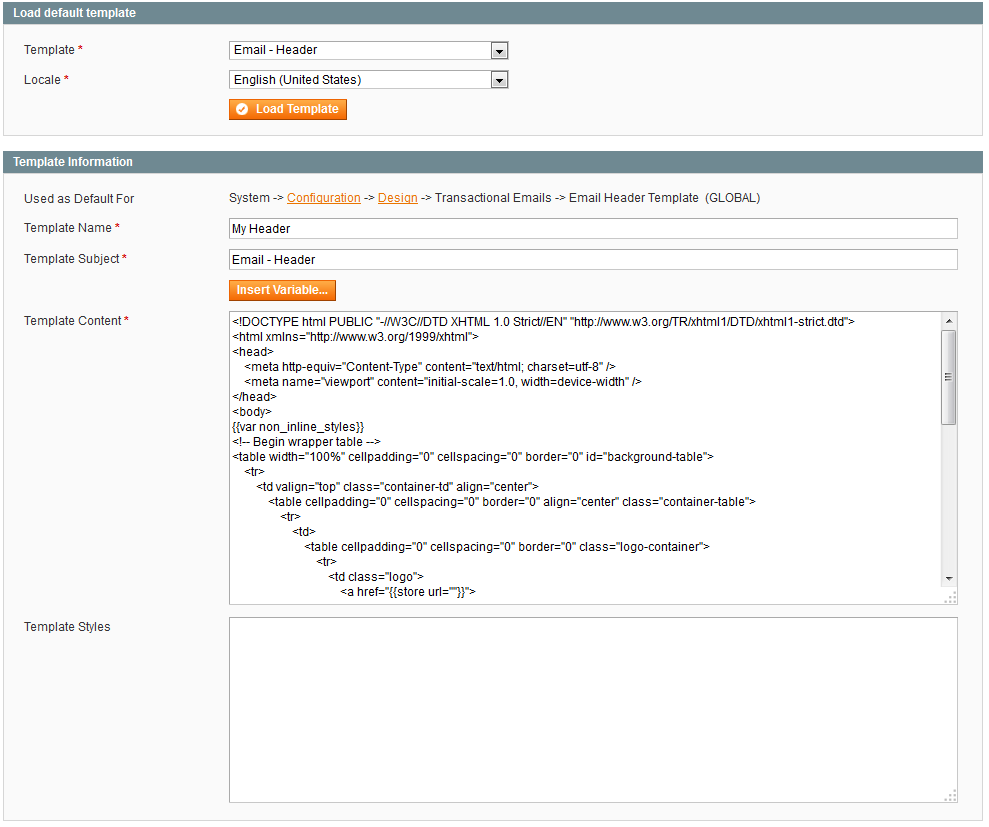
- Click Preview Template to look at the HTML code in a separate browser tab page or window, or click Save Template to save it.
Using the Template in a Website or Store View
This section discusses how to use the email template you just created in the global configuration, a website, or a store view.
To use this template:
- In the Admin Panel, click System > Configuration > GENERAL > Design.
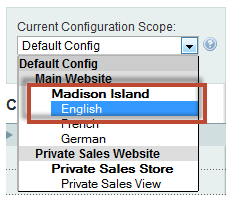
- From the Current Configuration Scope in the upper left corner, click the scope.
Initially, the template is associated with Default Config, which means it applies to all websites and store views. You can optionally associate it with a specific website or store view by selecting it from the list.
The following example shows how to associate a template with the Madison Island English store view.
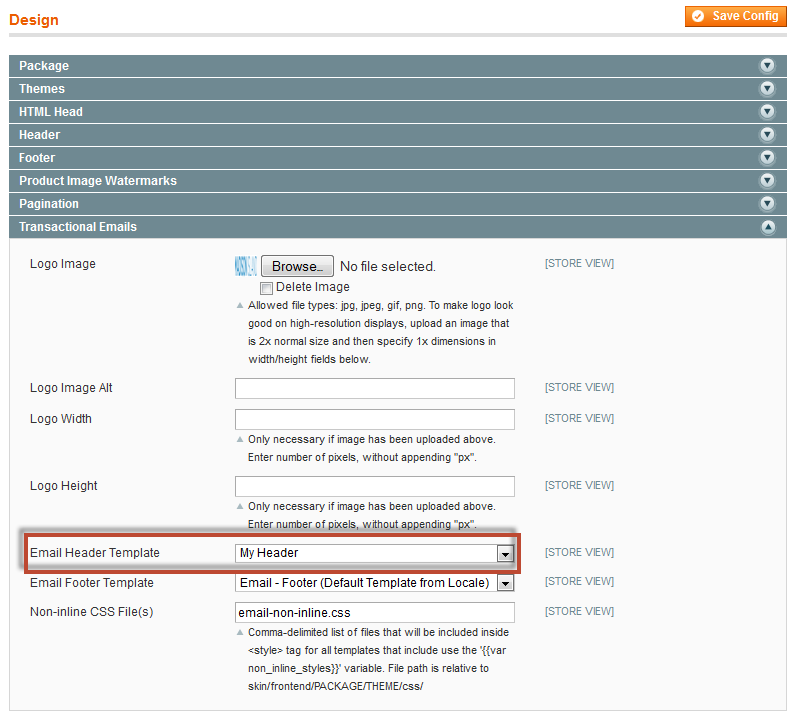
- In the right pane, click Transactional Emails to expand it.
- From the Email Header Template list, click the header template you created earlier.
The following figure shows an example:
- Click Save Config in the upper right corner of the page.
Now transactional emails use the header or footer template you created.
Customizing CSS Styles for Emails
CSS styles for transactional emails are "inlined" on each HTML tag because many email clients require it.
CE 1.9.1 and EE 1.14.1 simplifies the way you customize email templates by locating all CSS styles in separate CSS files. When transactional emails are sent, the CSS styles are loaded from the separate CSS files and are "inlined" in the HTML before being sent.
Inlining is done using the Emogrifier
library, which takes the HTML and CSS and adds all of the CSS styles to <style>
attributes on the HTML tags.
The CSS for the emails is contained in the following Sass files:
[your Magento install dir]/skin/frontend/rwd/default/scss/email-inline.scss[your Magento install dir]/skin/frontend/rwd/default/scss/email-non-inline.scss
As you might expect, these two files compile to skin/frontend/rwd/default/css/email-inline.css
and skin/frontend/rwd/default/css/email-non-inline.css, respectively. If you're not familiar
with how to work with Sass files, refer to the RWD theme documentation.
Using Inline Styles to Customize Email CSS
The email-inline.css file contains all of the styles that the Emogrifier class applies to the
HTML before an email is sent. Magento applies only these styles to an email template if it contains this new
directive:
{{inlinecss file="email-inline.css"}}
Notice that the templates in app/locale/en_US/template/email/ include this directive in each
email template. The directive enables you to specify CSS that loads from the current storefront's theme and
is inlined on that template.
The directive supports the standard Magento fallback hierarchy, which means that if the
email-inline.css can't be found in the store's theme, Magento looks in each of the parent
themes until a match is found. (A sample theme directory is
skin/frontend/custompackage/customtheme/css/email-inline.css)
Refer to the Emogrifier README to see what CSS selectors are supported.
{{inlinecss file=""}}
directive can be used a single time and cannot be used in templates that get included by other templates
(for example, app/locale/en_US/template/email/html/header.html and
app/locale/en_US/template/email/html/footer.html).Using Non-Inline Styles to Customize Email CSS
There are certain CSS styles that can't be applied inline, such as media queries styles. These styles must be
in a <style type="text/css"></style> tag.
To understand how non-inline styles are included, see line 7 in
app/locale/en_US/template/email/html/header.html:
The variable {{var non_inline_styles}} loads CSS from several sources:
- The contents of
email-non-inline.css.
The file loads from the current storefront's theme and supports the same fallback structure as theemail-inline.cssfile. For Magento to load additional files, go to System > Configuration > GENERAL > Design, click the Transactional Emails section and change the value of the Non-inline CSS File(s) field. - Each of the transactional emails has a comment at the top of the template in this format:
<!--@styles
@-->
If you modify a template and add CSS styles inside that comment, they are included in thenon_inline_stylesvariable. - If you customize transactional emails using the Magento Admin Panel, you can add CSS styles to the
Template Styles field to include those styles in the
non_inline_stylesvariable. For more information, see Customizing Header and Footer Templates Using the Magento Admin Panel.
After the CSS is loaded, it's wrapped in a <style
type="text/css"></style> tag and is assigned to the
non_inline_styles variable.
!important declaration after each property so the style has a high enough
specificity to get applied. This is the best way to get your custom styles to override styles
defined in the email-inline.css file.Using a High-Resolution Logo
For the logo in your email to look optimal on high-resolution devices such as retina displays, you must use a logo that is at least two times larger than the area in which you want it to display. For example, let's say your email has a 200px × 100px area for the logo. The logo image must be at least 400px × 200px.
If you don't have access to a high-resolution version of your logo, you can upload a normal-resolution
image. For example, if your logo image is 200px × 100px, specify 200 for the width
and 100 for the height.
Upgrade Considerations
This section applies to you if you upgraded to CE 1.9.1 or EE 1.14.1 from an earlier version.
In CE 1.19.1 and EE 1.14.1 for the first time, transactional email templates specify the width and height of the area in which the logo displays. Therefore, if you use transactional emails, you must configure your templates with a logo height and width as discussed in the next section.
For example, suppose the area in which the logo displays is 200px × 100px. Specify 200
for height and 100 for width even if the physical dimensions of the logo are larger.
Adding a High-Resolution Logo
You can add your logo to transactional emails in either of the following ways:
- Updating a High-Resolution Logo Using the File System
- Updating a High-Resolution Logo Using the Admin Panel
Updating a High-Resolution Logo Using the File System
If you can access the Magento server file system, follow these steps:
- Locate the skin directory for your store (for example,
skin/frontend/custompackage/customtheme/). - Save the logo image as
logo_email.gifin the skin directory (for example,skin/frontend/custompackage/customtheme/images/logo_email.gif). - Open
app/locale/en_US/template/email/html/header.htmlin a text editor. - Update the width and height attributes to reflect the area in
which you want your logo to display (for example, 200px × 100px).
A snippet follows:
<img
    {{if logo_width}}
    width="{{var logo_width}}"
    {{else}}
    width="200"
    {{/if}}

    {{if logo_height}}
    height="{{var logo_height}}"
    {{else}}
    height="100"
    {{/if}}

    src="{{var logo_url}}"
    alt="{{var logo_alt}}"
    border="0"/>
Updating a High-Resolution Logo Using the Admin Panel
You can update your high-resolution logo using the Admin Panel if any of the following are true:
- The file format is not GIF
- You don't have access to the Magento server file system
- The logo is specific to a website, store, or store view
To upload a high-resolution logo using the Admin Panel:
- Log in to the Magento Admin Panel as an administrator.
- Click System > Configuration > GENERAL > Design.
- From the Current Configuration Scope in the upper left corner, click the scope to
display the logo.
Initially, the logo is associated with Default Config, which means it applies to all websites and store views. You can optionally associate it with a specific website or store view by selecting it from the list.
The following example shows how to associate a logo with the Madison Island English store view.
- In the right pane, click Transactional Emails to expand it.
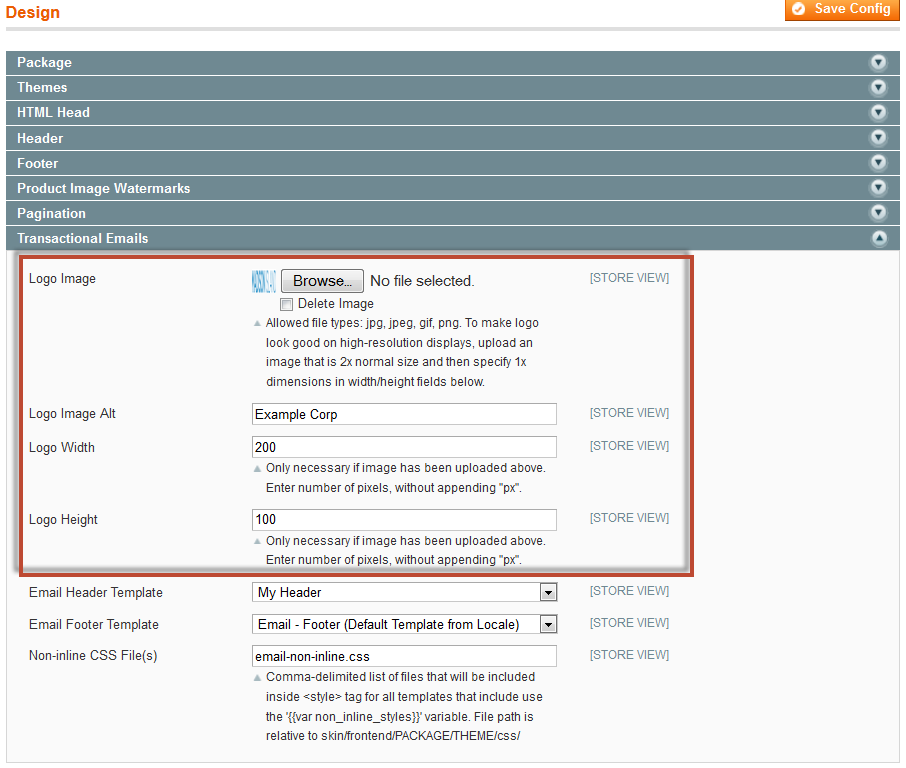
- Enter the following information:
Item Description Logo Image Click Browse and browse to locate the logo image. Delete Image checkbox Select the checkbox to delete the current logo image. Ignore the other fields. Logo Image Alt field Enter alternate text to display if the image is not available. For a logo, it's typically the name of your company. Logo Width field Enter the numeric width, in pixels, of the area in which to display the image (not the dimensions of the logo image). Logo Height field Enter the numeric height, in pixels, of the area in which to display the image (not the dimensions of the logo image).
The following figure shows an example.
- Click Save Config in the upper right corner of the page.
Using Contact Information in Transaction Emails
Transactional emails can output your store email address, store phone number, and store hours of operation if those values are configured in the Admin Panel. To set those values:
- Log in to the Magento Admin Panel as an administrator.
- To set the phone number and hours of operation:
- Click System > Configuration > GENERAL > General.
- In the right pane, click Store Information to expand it.
- If you want to include a phone number, input the phone number in the Store Contact Telephone field.
- If you want to include your hours of operation, input them in the Store Hours of Operation field.
- To set the store email address:
- Click System > Configuration > GENERAL > Store Email Addresses.
- In the right pane, click General Contact or Sales Representative to expand it.
- In the Sender Name field, input the name that you want the email to be sent from, such as your company name.
- In the Sender Email field, input the email address.
- When you're finished, click Save Config in the upper right corner of the page.
Localizing Transactional Emails
Only the en_US templates were updated to the new responsive email structure. To use the responsive emails
for other locales, copy the en_US/template/email/ directory into the respective
app/locale/[LOCALE CODE] directory and update the text strings to that locale.
Using Updated Newsletter Templates
The focus of this article is on transactional emails but the same techniques can be used with newsletter templates as well, including:
- Import the header and footer using the
{{template
                            config_path=""}}
directives - Apply inline styles using the
{{inlinecss file=""}}directive - Include non-inline styles using
{{var
                            non_inline_styles}}
In the Magento Admin Panel, go to Newsletter > Newsletter Templates and look at the template named Example Newsletter Template. We added this template as a reference for how to build a responsive newsletter.
Getting Help
If you encounter issues customizing email templates, contact Magento Support. Another option is to post
your question on the community magento.stackexchange.com site and tag it with rwd-email and
rwd-theme.